Configure Company Preferences Options
It is also important to review and go through different options and settings on each of the tabs in Company Preferences so you can configure VisionCore to better suit your needs.
The following will explain briefly how each of the options work.
General Tab
This tab lists several buttons that open other forms that are used to customize VisionCore. For additional information of these forms see their various topics.
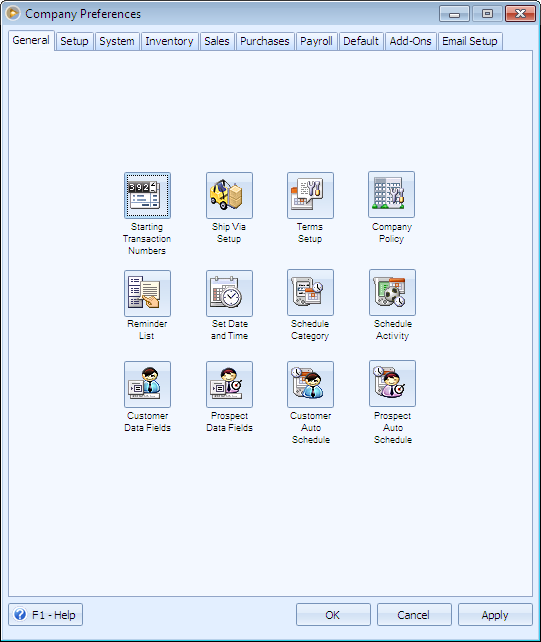
![]() Starting Transaction Numbers - will open the Starting Transaction Numbers form where you can adjust the starting numbers for your transactions.
Starting Transaction Numbers - will open the Starting Transaction Numbers form where you can adjust the starting numbers for your transactions.
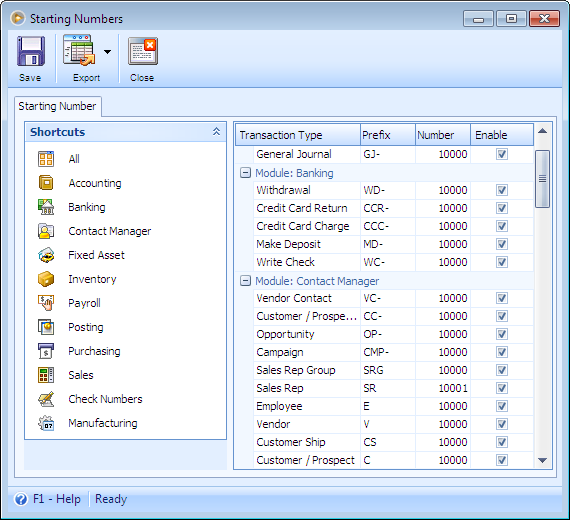
The Starting Numbers form is extremely important when you are initially setting up your company file. This form contains fields for every type of transaction in VisionCore where you can setup starting numbers. The Starting Numbers form can only be opened through the Company Preferences form and is not available directly from the Main Menu.
All starting numbers will increment automatically as they are used and can contain up to 20 alphanumeric characters. You can use spaces, symbols and even letters as long as the last character is a number. The last character must be a number so that VisionCore can increment that number each time it is used. If you use a letter then VisionCore will not be able to increment it.
For example you could enter a starting number like "SR10000" and each time that number is used VisionCore will increment it to " SR10001" and then " SR10002" and so on.
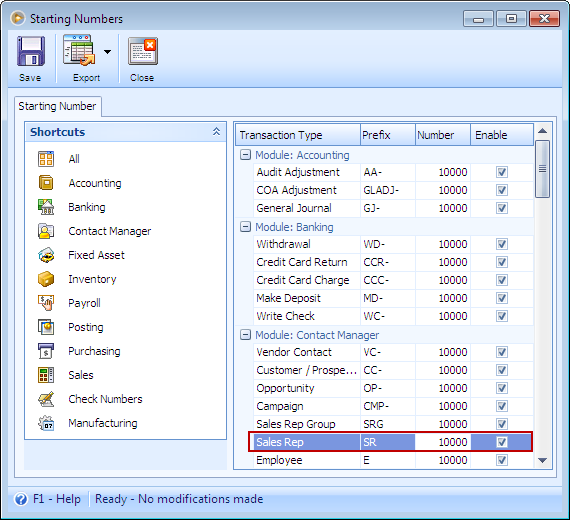
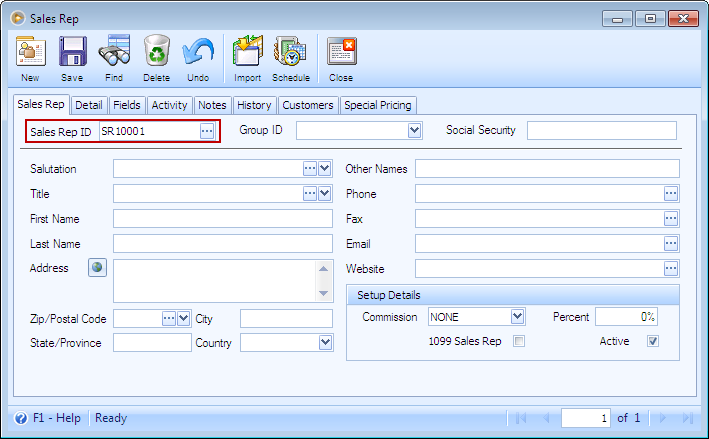
If you click add on any transaction that uses a starting number and then decide to cancel or delete that record, the starting number will still be incremented by one. You can come back to this form and change the starting numbers for any of the fields but just make sure it will not have a chance to duplicate eventually.
In the left side of the form, modules' shortcuts are listed. As you click on any of the modules, transaction types under that module will be listed on the opposite side. By default, all records and transactions will be shown in the transaction type area.
![]() Ship Via Setup - will open the Ship Via form where you can add, edit or delete shipping methods for your transactions. If you created a new company, this form will only show the Ship Via you added on the New Company Setup Wizard.
Ship Via Setup - will open the Ship Via form where you can add, edit or delete shipping methods for your transactions. If you created a new company, this form will only show the Ship Via you added on the New Company Setup Wizard.
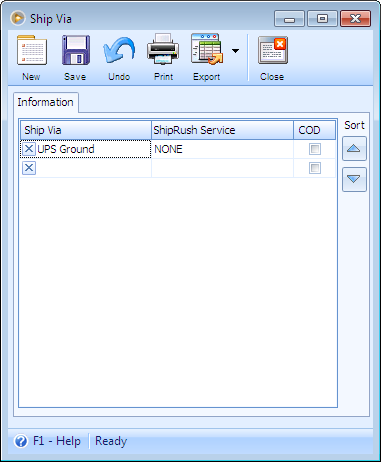
In the Ship Via form you can create a list of your most common shipping methods. This will save you the time from manually entering a shipping method each time you are in a form.
![]() Terms Setup - will open the Terms form where you can add, edit or delete payment terms for your customers and also the payment terms given to you by your vendors. If you created a new company, this form will only show the Terms you added on the New Company Setup Wizard.
Terms Setup - will open the Terms form where you can add, edit or delete payment terms for your customers and also the payment terms given to you by your vendors. If you created a new company, this form will only show the Terms you added on the New Company Setup Wizard.
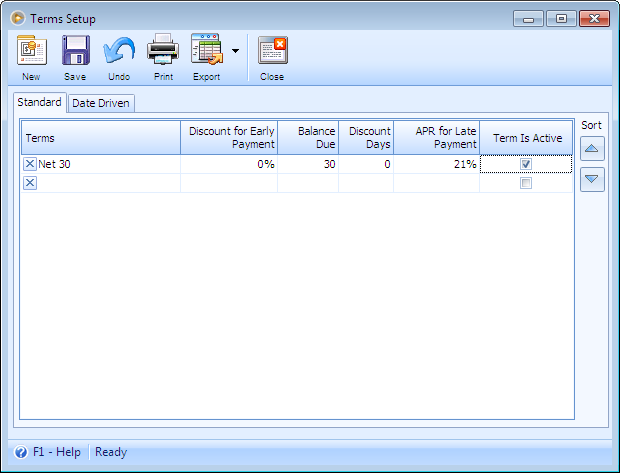
In the Terms form you setup a list of your payment terms for customers and vendors. Terms are the method for payment that you can assign to each of your customers or the terms given to you by your vendors. You can enter as many Terms as your company may use in this form by clicking the New button. The Terms are very important when it comes to the Receivables and Payables forms. If you setup a Term to give discounts or charge interest then the date that the invoices are paid will determine if there will be discounts or interest charged on those invoices.
Standard tab
Terms - is a description name field used to describe the type of terms. An example might be "COD", "2% 10 Net 30" or "Company Check".
Discount for Early Payment - enter the actual discount percent given if the payment is made within the number of Discount Days. If you want your customer to get a 2% discount for paying within the Discount Days field then enter 2 in this field.
Balance Due - is the where you enter the number of days that the payment must be received before it is considered late.
Discount Days - is used to enter the number of days given to receive a discount for paying an invoice early in the Receivables or Payables forms.
APR for Late Payment - enter a yearly percent if you want to charge a late fee when the payment is not received within the Balance Due Days field. If you want to charge 2% each month on late charges then make sure you enter the yearly equivalent (APR) of 24% in this field. VisionCore will charge interest based on each month the customer is late when entering Receivables.
Term is Active - can be used to make a term active or inactive. When the active check box is deselected, the term will in effect be disabled and you will not be able to use it.
Date Driven Tab
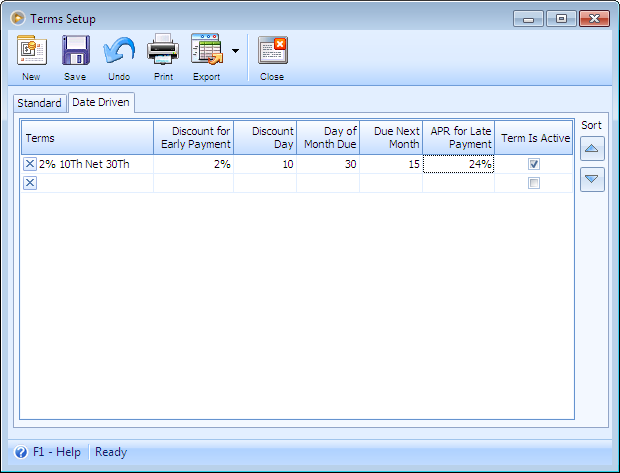
Terms - is a description name field used to describe the type of terms. An example might be "2% 10th net 30th".
Discount for Early Payment - enter the actual discount percent given if the payment is made within the setup date. For example, the terms is "2% 10th net 30th", if you want your customer to get a 2% discount for paying on or before the 10th of the month, then enter 2 in this field.
Discount Day - is used to enter the day where discount would be valid. Allowed value in this field is 1 to 31 only, which represents calendar days. For example, the terms is "2% 10th net 30th", if you want to set the discount day of your customer to be on the 10th of the month, then enter 10 in this field. When the invoice is paid on or before the 10th of the month, then the customer gets to avail a 2% discount.
Day of Month Due (Net due before the __ the day of the month) - is used to enter the day where payment must be received before it is considered late. Allowed value in this field is 1 to 31 only, which represents calendar days. For example, the terms is "2% 10th net 30th", if you want to set the due date of the invoice to be on the 30th of the month, enter 30 in this field. When the invoice is not paid on or before the 30th of the month, there will be interest charged on that invoice.
Due Next Month (Due next month if issued within __ days of the due date) - can be used to set the number of days from the Due Date, which will determine if the invoice is due next month. If the invoice is issued within the set days, then the invoice is due next month. For example, if 15 is entered in this field, and terms is "2% 10th net 30th", when the invoice is issued within 15 days from the Due date, that invoice will be due next month.
APR for Late Payment - enter a yearly percent if you want to charge a late fee when the payment is not received within the Day of Month Due field. If you want to charge 2% each month on late charges then make sure you enter the yearly equivalent (APR) of 24% in this field. VisionCore will charge interest based on each month the customer is late when entering Receivables.
Term is Active - can be used to make a term active or inactive. When the active check box is deselected, the term will in effect be disabled and you will not be able to use it.
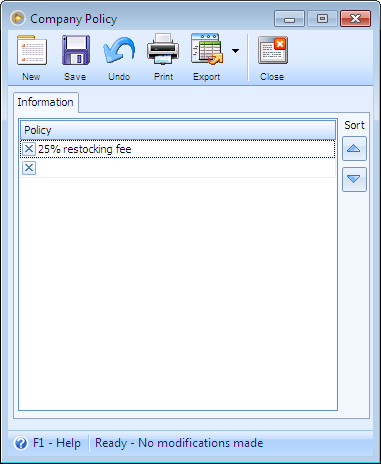
![]() Company Policy - will open the Company Policy form where you can add, edit or delete your company policies.
Company Policy - will open the Company Policy form where you can add, edit or delete your company policies.
![]() Reminder List - will open the Reminder List form where you can view any system reminders.
Reminder List - will open the Reminder List form where you can view any system reminders.
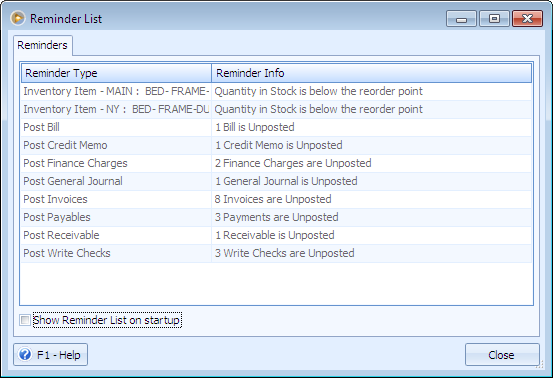
The Reminders form displays a detailed list of items that needs to be completed. Some of these items may include the number of Unposted transactions, Inventory that needs to be reordered or unbalances in your General Ledger. You can choose to have this form open every time you run VisionCore by changing the settings in the User Preferences form - System Tab or by enabling the Show Reminder List on startup at the bottom of this form. This is a handy way of making sure all your transactions have been posted before you close a period or fiscal year.
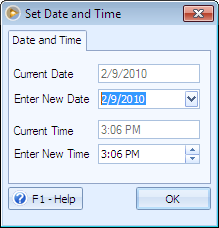
![]() Set Date and Time - will open the Set and Time form where you can adjust your system’s Date and Time.
Set Date and Time - will open the Set and Time form where you can adjust your system’s Date and Time.
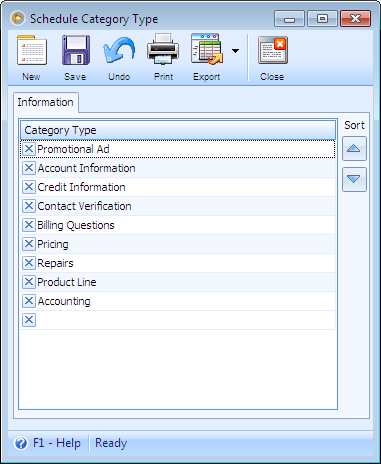
![]() Schedule Category - will open the Schedule Category Type form where you can create category types for the schedule activity form.
Schedule Category - will open the Schedule Category Type form where you can create category types for the schedule activity form.
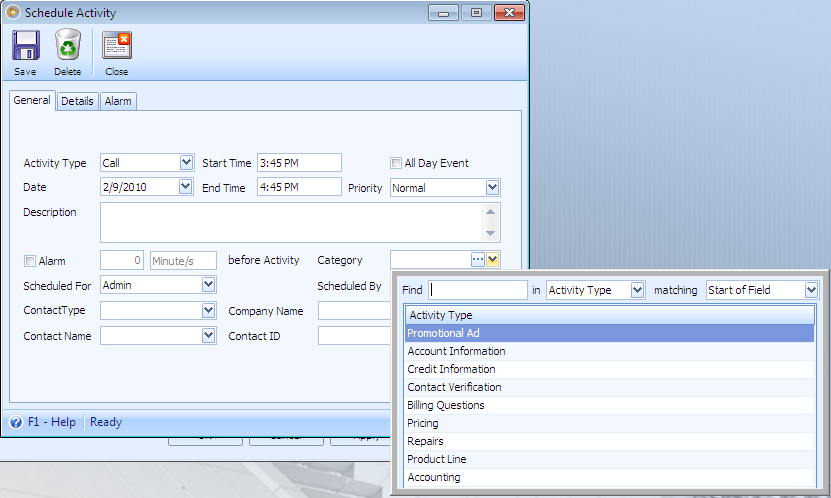
![]() Schedule Activity - will open the Schedule Activity form where you can view or enter activities.
Schedule Activity - will open the Schedule Activity form where you can view or enter activities.
![]() Customer Data Fields - will open the Customer Data Fields form where you may enter company defined data or question fields for the customer form.
Customer Data Fields - will open the Customer Data Fields form where you may enter company defined data or question fields for the customer form.
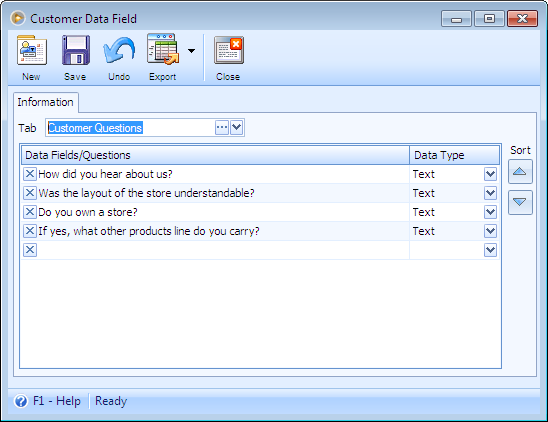
You can also view the Customer Data Field form from the Data Tab of the Customer form by clicking the Edit button. This form is used to record customer data or answers to questions that have been asked. The Customer Data Field form also allows you to add, edit or delete customer data field. The Data type field next to Data fields/Questions field gives you these options: whether the information to be entered will be text, a number, yes/no or a date.
![]() Prospect Data Fields - will open the Prospect Data Fields form where you may enter company defined data or question fields for the prospect form.
Prospect Data Fields - will open the Prospect Data Fields form where you may enter company defined data or question fields for the prospect form.
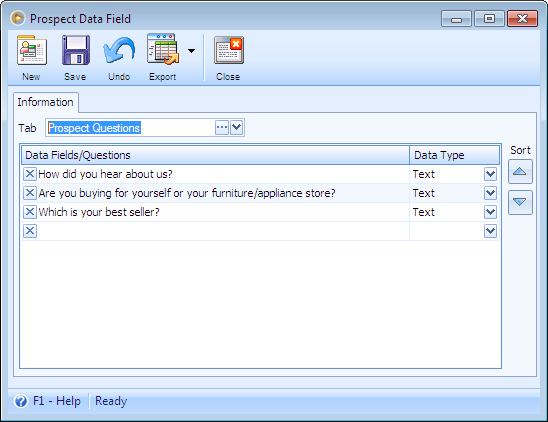
You can view the Prospect Data Field form from the Data Tab of the Prospect form by clicking the Edit button. This form is used to record prospect data or answers to questions that have been asked. The Prospect Data Field form also allows you to add, edit or delete prospect data field. The Data type field next to Data fields/Questions field gives you these options: whether the information to be entered will be text, a number, yes/no or a date.
![]() Customer Auto Schedule - will open the Customer Auto Schedule form where you may schedule auto activity/events following the creation date of a customer by a user.
Customer Auto Schedule - will open the Customer Auto Schedule form where you may schedule auto activity/events following the creation date of a customer by a user.
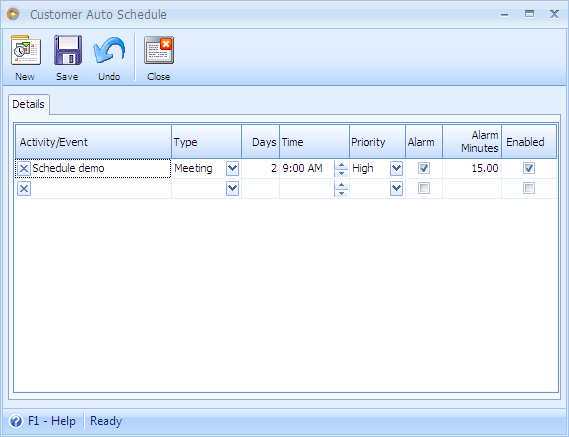
The Customer Auto Schedule form is where you may schedule auto activity/events following the creation date of a customer by a user. This form allows you to add, edit or delete a schedule auto activity/event. For more details about this feature and how this works, see How Customer Auto Schedule works.
•Prospect Auto Schedule - will open the Customer Auto Schedule form where you may schedule auto activity/events following the creation date of a prospect by a user.
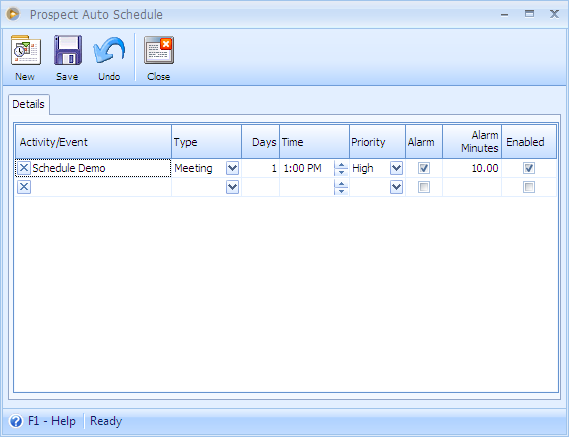
The Prospect Auto Schedule form is where you may schedule auto activity/events following the creation date of a prospect by a user. This form allows you to add, edit or delete a schedule auto activity/event. For more details about this feature and how this works, see How Prospect Auto Schedule works.
Setup Tab
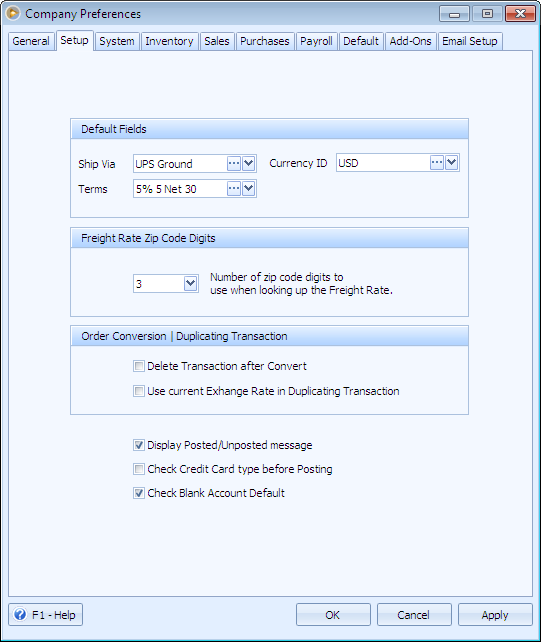
Default Fields
![]() The Ship Via field allows you to select the default shipping method you want entered into the ship via fields.
The Ship Via field allows you to select the default shipping method you want entered into the ship via fields.
![]() The Terms field is used to select the default terms you want entered into the terms fields.
The Terms field is used to select the default terms you want entered into the terms fields.
![]() The Currency ID field is used to select the default Currency you want to use throughout VisionCore. Normally this is set to your country's home currency, which should be setup in the Currency Exchange Rate form, when you start using VisionCore. You will notice that if you use a different currency than your default, or home currency, some fields in transactional forms like totals will display a different background color as to what is setup in Company Preferences form.
The Currency ID field is used to select the default Currency you want to use throughout VisionCore. Normally this is set to your country's home currency, which should be setup in the Currency Exchange Rate form, when you start using VisionCore. You will notice that if you use a different currency than your default, or home currency, some fields in transactional forms like totals will display a different background color as to what is setup in Company Preferences form.
Order Conversion / Duplicating Transaction
![]() If Delete Transaction after Convert is selected, then every time you convert a transaction, VisionCore will automatically delete the order or purchase order.
If Delete Transaction after Convert is selected, then every time you convert a transaction, VisionCore will automatically delete the order or purchase order.
![]() Display Posted/Unposted message
Display Posted/Unposted message
When this option is enabled the Posted/Unposted message box will be displayed after clicking the Post/Unpost button. For more details about this feature and how this works, see Display Posted/Unposted message.
![]() Check Credit Card Type before Posting
Check Credit Card Type before Posting
This option goes along with the PC Charge feature enabled and Payment Method selected is set as Credit Card. Once these 2 are properly setup and Check Credit Card Type before Posting option is enabled, then the system will check if the invoice has not undergone the PCCharge process. If it sees that it has not undergone the PCCharge process this message will be shown, 'You are not about to Post an Invoice without processing the PCCharge. Do you want to continue?
![]() Check Blank Account Default
Check Blank Account Default
When this option is enabled, VisionCore will check if there are fields in Default Accounts that are not filled in. If there are, then there will be a warning message for blank Default Accounts after logging in. For more details about this feature and how this works, Check Blank Account Default.
System Tab
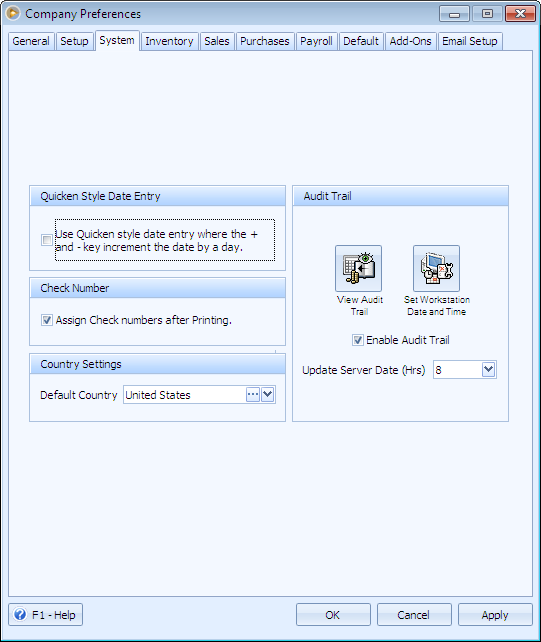
Quicken Style Date Entry
![]() Use Quicken style date entry where the + and - key increment the date by a day
Use Quicken style date entry where the + and - key increment the date by a day
This allows you to change any date in the program a day at a time by pressing the + or - keys. When you press the + key the date will increase by 1 day at a time and pressing the - key the date will decrease by 1 day at a time. If you use the + or - keys in a date field that does not have a date entered yet the program will automatically use the systems date and either add or subtract 1 day based on the key you pressed.
Check Number
![]() Assign Check numbers after Printing
Assign Check numbers after Printing
This allows you to assign check numbers after Printing the check. This option prevents the check from skipping as all checks are being tracked in the Check Number Audit form. For more details about this feature and how this works, see Assign Check Numbers after Printing.
Country Settings
![]() Default Country
Default Country
The Default Country combo box field is mainly used to populate the default country when adding new zip codes. This will be defaulted to United States in the Sample Company and for the new company data files, will be defaulted to the country you set in the New Company Setup Wizard. Every time a user adds a new zip code, the country field will default to what was setup in this field.
Audit Trail
![]() Audit Trail
Audit Trail
The Audit Trail area is used to select if you want VisionCore to keep a detailed audit trail of all events within the program. If you wish to view the audit trail at any time you can press the View Audit Trail button and the Audit Trail form will be displayed.
The Set Workstation Data and Time button when clicked will synchronize your workstation's date and time with your Server's date and time. Then this message will be shown, "The Workstation Date and Time has been adjusted to the Servers Date and Time!"
If you wish to not use the audit trail feature, then uncheck the Enable Audit Trail checkbox.
In the Update Server Date (Hrs) field, enter how many hours apart the server should be updated. It is recommended that you backup the server at least once per day.
Inventory Tab
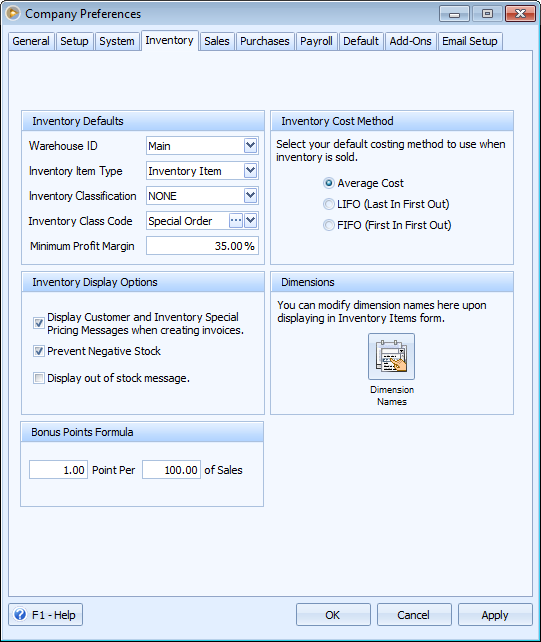
Inventory Defaults
![]() The Warehouse ID is used to track inventory in warehouses and set to the default warehouse you want to use. "MAIN" is the default Warehouse that is setup for you in the Warehouse Locations form when you create a new database. This can be changed to any add warehouse record you create.
The Warehouse ID is used to track inventory in warehouses and set to the default warehouse you want to use. "MAIN" is the default Warehouse that is setup for you in the Warehouse Locations form when you create a new database. This can be changed to any add warehouse record you create.
![]() Select the default Inventory Item Type you wish to use when adding inventory.
Select the default Inventory Item Type you wish to use when adding inventory.
![]() Select the default Inventory Classification you wish to use when adding inventory.
Select the default Inventory Classification you wish to use when adding inventory.
![]() Select the default Inventory Class Code you wish to use when adding inventory. The Inventory Class Code can be setup in the Inventory Class Code form by clicking the Ellipse button next to this field.
Select the default Inventory Class Code you wish to use when adding inventory. The Inventory Class Code can be setup in the Inventory Class Code form by clicking the Ellipse button next to this field.
![]() The Minimum Profit Margin field is used to enter the rate for minimum profit margin. Once a rate is entered in this field, manually entering of sales price that falls below the minimum profit margin in Invoices will prompt you with a message letting you know that the entered sales price falls below the minimum margin.
The Minimum Profit Margin field is used to enter the rate for minimum profit margin. Once a rate is entered in this field, manually entering of sales price that falls below the minimum profit margin in Invoices will prompt you with a message letting you know that the entered sales price falls below the minimum margin.
Inventory Cost Method
The Cost Method is a very important field to setup. You can choose from three different inventory cost methods, Average Cost, LIFO or FIFO. This allows you to select the way your inventory is sold. This will be the default costing method that the Inventory Items form will use when you add new inventory items.
![]() Average Cost - Takes an average of the total inventory in stock to determine the cost of the inventory. This is the default selection when you create a new data file.
Average Cost - Takes an average of the total inventory in stock to determine the cost of the inventory. This is the default selection when you create a new data file.
![]() LIFO (Last In First Out) - Uses the cost of the Last inventory item purchased. This method will sell your inventory in an order of last purchased inventory or your newest inventory to be sold first. This is a good method for an antique dealer or any other company where inventory becomes worth more the older it gets. You would always want to sell your newest inventory before your oldest inventory in that case.
LIFO (Last In First Out) - Uses the cost of the Last inventory item purchased. This method will sell your inventory in an order of last purchased inventory or your newest inventory to be sold first. This is a good method for an antique dealer or any other company where inventory becomes worth more the older it gets. You would always want to sell your newest inventory before your oldest inventory in that case.
![]() FIFO (First In First Out) - Uses the cost of the First inventory item purchased. This method will sell your inventory in an order of first purchased inventory or your oldest inventory to be sold first. This is a good method for a technology based company or any other company where inventory becomes worth less the older it gets. You would always want to sell your oldest inventory before your newest inventory then.
FIFO (First In First Out) - Uses the cost of the First inventory item purchased. This method will sell your inventory in an order of first purchased inventory or your oldest inventory to be sold first. This is a good method for a technology based company or any other company where inventory becomes worth less the older it gets. You would always want to sell your oldest inventory before your newest inventory then.
Inventory Display Options
![]() Display Customer and Inventory Special Pricing Messages when creating invoices
Display Customer and Inventory Special Pricing Messages when creating invoices
By selecting this option any Customer Special Pricing or Inventory Special Pricing used will display a message letting you know that the customer or item you are selling is assigned a special price. This way you can alert your customer they are getting a better price than normal.
![]() Prevent Negative Stock
Prevent Negative Stock
By default the Prevent Negative Stock is enabled. With this feature being selected, this will prevent the stock to go negative. A message will display letting you know that the said transaction would make the stock negative.
![]() Display out of stock message
Display out of stock message
By default the Display out of stock message is disabled. With this feature being selected, there will be a warning message every time an item is added to an Order or Invoice that is not available in stock. For more details about this feature and how this works, see Display out of stock message.
Dimensions
![]() Dimension Names
Dimension Names
The Dimension Names button will open the Dimension Names form where you can modify the 3 fields, namely Length, Width, and Height that will be displayed in the Unit of Measure area of Inventory Items form - Setup tab.
![]() Bonus Points Formula
Bonus Points Formula
This area is used to setup the points to be earned by a customer per amount of sales. So with this, the more the purchases the customer has, the higher the points they earn. For more details about this feature and how this works, see Customer Points.
Sales Tab
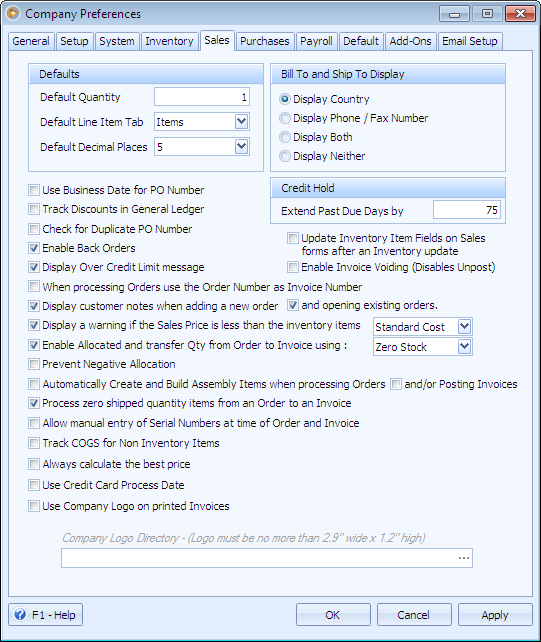
Defaults
![]() Default Quantity
Default Quantity
You can choose to change the default quantity of inventory items sold. For example, if you mostly sell products in groups of 3 you can set the default quantity to 3 so that when entering the line item in the order or invoice form it will automatically select 3 for quantity.
![]() Important note: The default quantity is always set to zero unless you choose to change it.
Important note: The default quantity is always set to zero unless you choose to change it.
![]() Default Line Item Tab
Default Line Item Tab
The Default Line Item Tab field allows you to select the default tab in the Line Item Detail of the Quote, Order, Invoice, RMA and Credit Memo forms.
![]() Default Decimal Places
Default Decimal Places
You can select from 2 to 6 decimal places to be used for the amount fields, except for Total fields in sales transactions. The default is 2 and that normally works well for a standard currency but if you require more accurate currency rounding then you would want to change this setting.
Bill To and Ship To Display
You can choose what additional information will be displayed in the Bill To and Ship To areas of all the Sales and Service transactions. Besides the name, address and city data you can choose to display the country, phone number, both the country and phone number or neither of them. If you choose the Phone Number, VisionCore will use the first number it finds in the Contacts Method area of the selected customer. So make sure you enter the phone number you want displayed first in the list of the contact methods Line Item Detail.
Credit Hold
![]() Extend Past Due Days by
Extend Past Due Days by
This field is based on the number of days you want to go by before the program puts a Credit Hold on a past due transaction. For instance, if you entered 10 in this field and you had a customer who purchased an item and has not yet paid for it, the program would check to see if the unpaid invoice was older than 10 days. If the invoice was older than 10 days, the program would alert you the next time you try and enter a new invoice or order for that customer. You then would have the choice of overriding the message and continuing on with the add order.
![]() Use Today's Date for PO Number
Use Today's Date for PO Number
This feature, when enabled will automatically assign today's date for PO Number field in Sales and Service transactions.
![]() Track Discounts in General Ledger
Track Discounts in General Ledger
This feature will allow you to turn on or off the detailed tracking of line item discounts to the GL when posting an Invoice. If the option is on, VisionCore will add two extra entries to the GL. The first will Debit an Expense account for the percent discount given and the other entry will Credit a Cost of Sales account for the discount given.
![]() Check for Duplicate PO Number
Check for Duplicate PO Number
By selecting this option a message will display letting you know that the Customer PO Number entered already exists in another Invoice.
![]() Enable Back Orders
Enable Back Orders
When this feature is enabled and Accept BO checkbox in Customer form is also enabled, posting an invoice with Ship qty lesser than that of the Qty Ordered, will prompt the user of a message asking to create back order or purchase order.
![]() Display Over Credit Limit message
Display Over Credit Limit message
This field is based on the Credit Limit assigned in Customer form > Setup tab > Credit Limit field. When this feature is enabled and Customer balance reaches the Credit Limit assigned, there will be a message letting you know that the customer exceeds its credit limit. For instance, if the Customer's Credit Limit is set to $1,000 and its Credit Balance is $1,100 the next time you try and enter a new invoice or order for that customer, a message will alert you that the said customer already exceeds its credit limit. You then would have the choice of overriding the message and continuing on with the add order.
![]() When processing Orders use the Order Number as Invoice Number
When processing Orders use the Order Number as Invoice Number
This feature when enabled, will use the Order Number as the Invoice number when processing Order to Invoice.
![]() Display Customers Notes when adding New Order
Display Customers Notes when adding New Order
You can choose to have the customers notes appear every time you create a new Sales or Service transaction. This can be handy if you want certain information displayed from the notes field of the customer form when you are creating a new order for them.
![]() And Existing Orders
And Existing Orders
You can choose to have the customers notes appear every time you open an existing Sales or Service transaction. This can be handy if you want certain information displayed from the notes field of the Customer form when you are opening and existing order.
![]() Display a warning if the Sales Price is less than the inventory items: Standard Cost, Current Cost or Average Cost.
Display a warning if the Sales Price is less than the inventory items: Standard Cost, Current Cost or Average Cost.
By selecting this option a message will display letting you know that the Sales Price entered in the Sales transaction is less than the inventory item's selected Cost.
The field next to it is where you may select a cost (Standard Cost, Current Cost or Average Cost) that will be used for comparing the Sales Price.
![]() Enable Allocated and transfer Qty from Order to Invoice using: (Allocated Qty, Available Stock, Ordered Qty, Zero Stock)
Enable Allocated and transfer Qty from Order to Invoice using: (Allocated Qty, Available Stock, Ordered Qty, Zero Stock)
You can choose to automatically fill in the Shipped field in the Invoice form with the quantity entered in the Allocated field in the Order form when converting an order to invoice.
![]() Automatically Create and Build Assembly Items when processing Orders
Automatically Create and Build Assembly Items when processing Orders
You can choose to automatically create and build assembly items when processing Orders to Invoice. If this option is on, upon processing Order to Invoice, a message will display letting you know if you would like to automatically build assembly items for the order.
![]() Allow manual entry of Serial Numbers at time of Order and Invoice
Allow manual entry of Serial Numbers at time of Order and Invoice
You can choose to manually enter the serial numbers for items that are serialized every time you create an Order or Invoice.
![]() Use Company Logo on printed invoices
Use Company Logo on printed invoices
This feature will allow you to have, or not have your company's logo on all printed Invoices. If the option is on, VisionCore will display and print the specified logo on all Invoices, Quotes, Packing Slips, Orders, Back Orders, Bills and Purchase Orders in the upper left corner. Without this feature selected, VisionCore will type text in this area pulled from the information you entered in the Company Setup form. By selecting this check box you will display the path, or Company Logo Directory, of where the company logo is stored on the local hard drive. To fit properly, the logo can be no larger than 2.9" wide x 1.5" high.
![]() Update Inventory Items Fields on Sales forms after an Inventory update
Update Inventory Items Fields on Sales forms after an Inventory update
When this option is checked, any change made to an item will reflect on all Sales transactions(Quote, Order, Invoice, RMA, and Credit Memo) that use the item. See Rules on Update Inventory Item Fields
![]() Enable Invoice Voiding (Disables Unpost)
Enable Invoice Voiding (Disables Unpost)
When this option is enabled, this will allow you to Void an invoice transaction. See Enable Invoice Voiding (Disables Unpost)
Purchases Tab
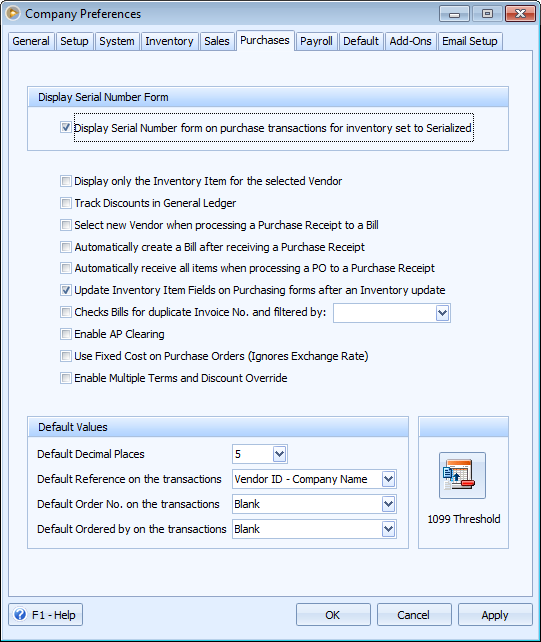
Display Serial Number Form
![]() Display Serial Number form on purchase transactions for inventory set to Serialized
Display Serial Number form on purchase transactions for inventory set to Serialized
If this option is checked then every time you create a new Purchase Receipt, the Inventory Serial Number form will open for inventory items setup to track serial numbers. This gives you a convenient way of adding serial numbers for items you receive.
![]() Display only the Inventory Item for the selected Vendor
Display only the Inventory Item for the selected Vendor
When creating any kind of Purchase Transaction (Bill, Vendor Purchase Order, etc) the program will only display Inventory items for the selected Vendor. In order for this feature to work well, it is important that in the Inventory form you assign a Vendor ID to each of the inventory items. This way when you create a purchase transaction, the program can filter out all of the inventory that does not apply to that particular vendor.
![]() Track Discounts in General Ledger
Track Discounts in General Ledger
This feature will allow you to turn on or off the detailed tracking of line item discounts to the General Ledger when posting a Bill. If the option is on, VisionCore will add two extra entries to the General Ledger. The first will Credit an Expense account for the percent discount taken and the other entry will Debit a Revenue account for the discount taken.
![]() Select New Vendor when processing a Purchase Receipt to a Bill
Select New Vendor when processing a Purchase Receipt to a Bill
This feature will allow you select a different vendor when processing a Purchase Receipt to a Bill.
![]() Automatically create a Bill after receiving a Purchase Receipt
Automatically create a Bill after receiving a Purchase Receipt
This feature will allow you to automatically create a Bill after receiving a Purchase Receipt. If the option is on, upon clicking the Receive button in Purchase Receipt, you will get a message saying that the transaction was received successfully. Then when you click OK, another message will be displayed warning you that you are about to convert the selected Purchase Receipt to a Bill. You have the option at this point to cancel or go ahead and convert the selected record. If you confirm that you want to convert the selected record to a Bill, a message will be displayed saying that the Purchase Receipt has been converted to a Bill.
![]() Automatically receive all Items when processing a PO to a Purchase Receipt
Automatically receive all Items when processing a PO to a Purchase Receipt
This feature will allow you to automatically receive all items when processing Purchase Order to Purchase Receipt. If this option is on, upon clicking the Process button, you will be asked if you wish to convert the selected Purchase Order to a Purchase Receipt. If you select YES, a message will be displayed saying that the Purchase Order has been converted to Purchase Receipt. Then click again YES, and another message will be displayed saying that the transaction was received successfully. When you click OK, the Purchase Receipt will then automatically be tagged as Received.
![]() Update Inventory Item Fields on Purchasing forms after an Inventory Update
Update Inventory Item Fields on Purchasing forms after an Inventory Update
When this option is checked, any changes made to an item will reflect on all Purchasing transactions (Purchase Order, Purchase Receipt, Bills, and Debit Memo) that use the item.
Default Field
![]() Default Decimal Places
Default Decimal Places
You can select from 2 to 6 decimal places to be used for the amount fields, except for Total fields in sales transactions. The default is 2 and that normally works well for a standard currency but if you require more accurate currency rounding then you would want to change this setting.
Payroll Tab
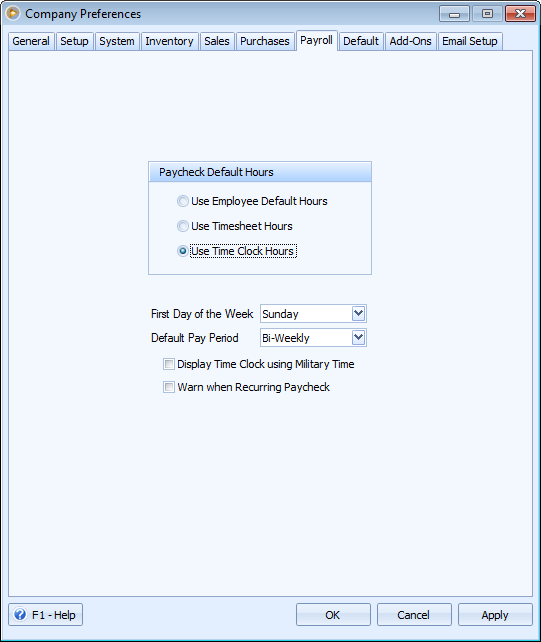
Paycheck Default Hours
![]() Use Employee Default Hours
Use Employee Default Hours
Enable the Use Employee Default Hours radio button and VisionCore will use the default hours on the Paycheck form.
![]() Use Timesheet Hours
Use Timesheet Hours
If you enable the Use Timesheet Hours radio button this will pull in the hours off of the Timesheet.
![]() Use Time Clock Hours
Use Time Clock Hours
If you enable the Use Time Clock Hours radio button this will pull in the hours off the Time Clock.
![]() First Day of the Week
First Day of the Week
Allows the first day of the week on timesheet to be defined by the company. If you normally have your pay periods run from Sunday 8/3 to Saturday 8/9, you would select Sunday as the first day of the week in the pull down box.
![]() Default Pay Period
Default Pay Period
Select the default Pay Period you wish to use in Pay Period field of Employee Setup form, Detail Tab.
![]() Display Time Clock using Military Time
Display Time Clock using Military Time
Enable this check box if you select to use military time in IN and OUT fields of Time Clock form.
![]() Warn when Recurring Paycheck
Warn when Recurring Paycheck
Once this option is enabled, when the user enters a begin date that is prior than that of the Last Paid date, there will be a message that would say something like this, "There are existing paychecks for the date selected. Are you sure you want to continue?" If YES is selected on this message, it will continue on creating checks for the selected group of employees, despite of having existing paychecks for the selected date. When NO is selected, this will just close this message and will bring you back to the Process Pay Groups form.
Default Tab
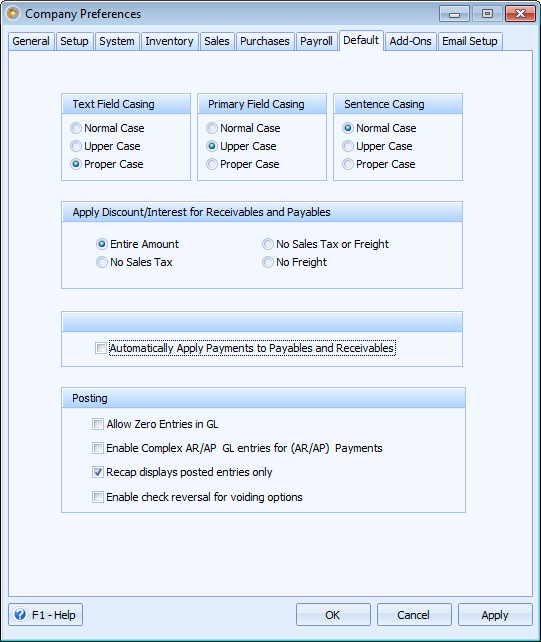
Text Fields Casing
You can use this option to change the way the text you enter is formatted. This can be very helpful when trying to keep data consistently entered throughout the program.
![]() Normal Case - Does not make any changes to the way text is entered. This would be how you turn this option off.
Normal Case - Does not make any changes to the way text is entered. This would be how you turn this option off.
![]() Upper Case - Will automatically capitalize every letter of every word.
Upper Case - Will automatically capitalize every letter of every word.
![]() Proper Case - Automatically capitalizes the first letter of each word and changes all the other letters to lower case.
Proper Case - Automatically capitalizes the first letter of each word and changes all the other letters to lower case.
Primary Field Casing
You can use this option to change the way the text you enter in primary fields is formatted. This can be very helpful when trying to keep data consistently entered throughout the program.
![]() Normal Case - Does not make any changes to the way text is entered. This would be how you turn this option off.
Normal Case - Does not make any changes to the way text is entered. This would be how you turn this option off.
![]() Upper Case - Will automatically capitalize every letter of every word.
Upper Case - Will automatically capitalize every letter of every word.
![]() Proper Case - Automatically capitalizes the first letter of each word and changes all the other letters to lower case.
Proper Case - Automatically capitalizes the first letter of each word and changes all the other letters to lower case.
Sentence Casing
You can use this option to change the way the text you enter in a sentence is formatted. This can be very helpful when trying to keep data consistently entered throughout the program.
![]() Normal Case - Does not make any changes to the way text is entered. This would be how you turn this option off.
Normal Case - Does not make any changes to the way text is entered. This would be how you turn this option off.
![]() Upper Case - Will automatically capitalize every letter of every word.
Upper Case - Will automatically capitalize every letter of every word.
![]() Proper Case - Automatically capitalize the first letter of each word and changes all the other letters to lower case.
Proper Case - Automatically capitalize the first letter of each word and changes all the other letters to lower case.
Apply Discount/Interest for Receivables and Payables
There are three options here that will affect how discounts and interest are applied to the Receivables or Payables forms.
![]() Entire Amount - Applies discounts or interest to the entire amount including sales tax, freight and other. This is the default selection when you create a new data file.
Entire Amount - Applies discounts or interest to the entire amount including sales tax, freight and other. This is the default selection when you create a new data file.
![]() No Sales Tax - Applies discounts or interest to the entire amount except sales tax.
No Sales Tax - Applies discounts or interest to the entire amount except sales tax.
![]() No Sales Tax or Freight - Applies discounts or interest to the entire amount except sales tax and freight.
No Sales Tax or Freight - Applies discounts or interest to the entire amount except sales tax and freight.
![]() No Freight - Applies discounts or interest to the entire amount except freight.
No Freight - Applies discounts or interest to the entire amount except freight.
![]() Automatically Apply Payments to Payables and Receivables
Automatically Apply Payments to Payables and Receivables
If you enable this option every time you enter an Amount Paid in either the Receivables or Payables form the program will automatically distribute the payment among all the unpaid invoices.
![]() Default Database Directory
Default Database Directory
You can select the default Database Directory by clicking the Ellipse button next to this field to browse for folder.
Posting
![]() Allow Zero Entries in GL
Allow Zero Entries in GL
When this option is enabled, zero amount transactions like Invoices, Bills, etc will allow you to open the recap and review zero entries for that transaction. Having this option disabled will show the message "There is no Recap information found for display" when Recap button is clicked on that transaction.
Add-Ons Tab
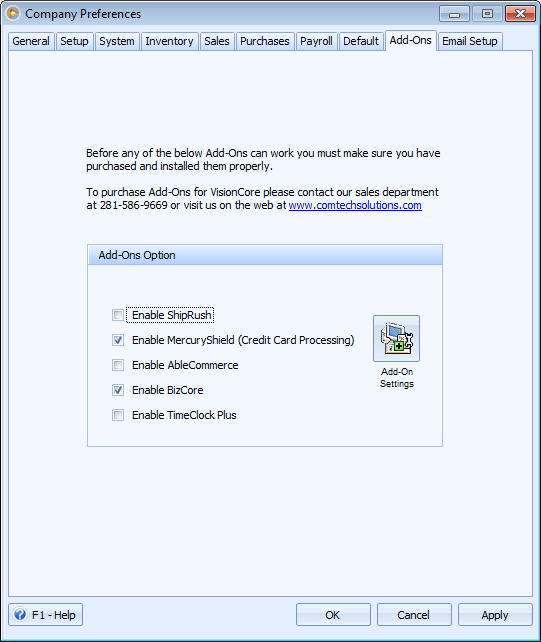
VisionCore has several Add-Ons options. This tab lets you enable the Add-On modules that you have purchased. Each Add-On Module is discussed separately.
Click the Add-On Settings button to open the Add-On Preferences form where you can configure ShipRush, PCCharge Server and AbleCommerce Settings.
Select the Installed Add-Ons
![]() Click the checkbox if you want to Enable ShipRush
Click the checkbox if you want to Enable ShipRush
![]() Click the checkbox if you want to Enable PCCharge Server
Click the checkbox if you want to Enable PCCharge Server
![]() Click the checkbox if you want to Enable AbleCommerce
Click the checkbox if you want to Enable AbleCommerce
![]() Note that before these add-on modules can work, you must make sure you have purchased and installed them properly.
Note that before these add-on modules can work, you must make sure you have purchased and installed them properly.
Email Setup
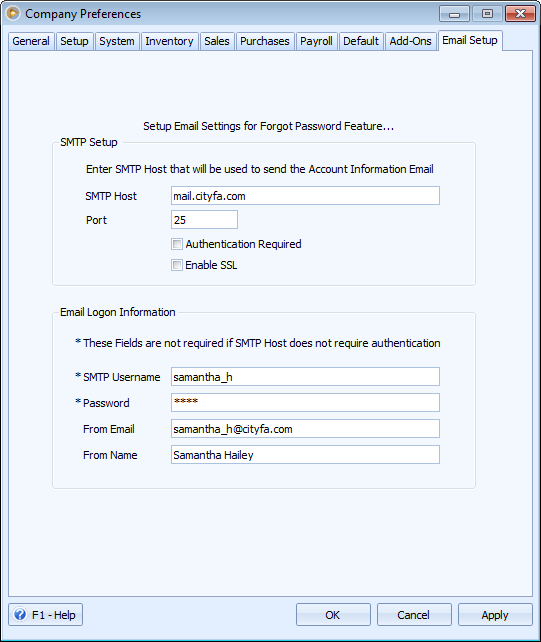
SMTP Setup
![]() SMTP Host - enter your Simple Mail Transfer Protocol (SMTP) server for outgoing messages. This is a setting that your Internet Service Provider (ISP) or IT Professional should provide you with.
SMTP Host - enter your Simple Mail Transfer Protocol (SMTP) server for outgoing messages. This is a setting that your Internet Service Provider (ISP) or IT Professional should provide you with.
![]() Authentication Required - when selected will requires you to fill in the SMTP Username and Password fields.
Authentication Required - when selected will requires you to fill in the SMTP Username and Password fields.
Email Logon Information
![]() SMTP Username and Password are settings that your ISP or IT Professional should provide you with.
SMTP Username and Password are settings that your ISP or IT Professional should provide you with.
![]() From E-mail should list the User's E-mail Address as the user would like it to appear in an e-mail.
From E-mail should list the User's E-mail Address as the user would like it to appear in an e-mail.
![]() From Name should list the User's Name as the user would like it to appear in an e-mail.
From Name should list the User's Name as the user would like it to appear in an e-mail.