Configure User Preferences Options
In the User Preferences form you can adjust several of the settings in VisionCore to better suit your specific workstation needs. For example, you can setup your Program resolution, Scheduler, Check Style, Check Type, Printing Defaults and Main Menu options. Most of these options are self-explanatory they are described in greater detail below grouped by their tab names. The User Preference information will be saved per User Name specified in the Security form. This enables you to login at different workstations and still have your specified User Preferences saved.
Setup Tab
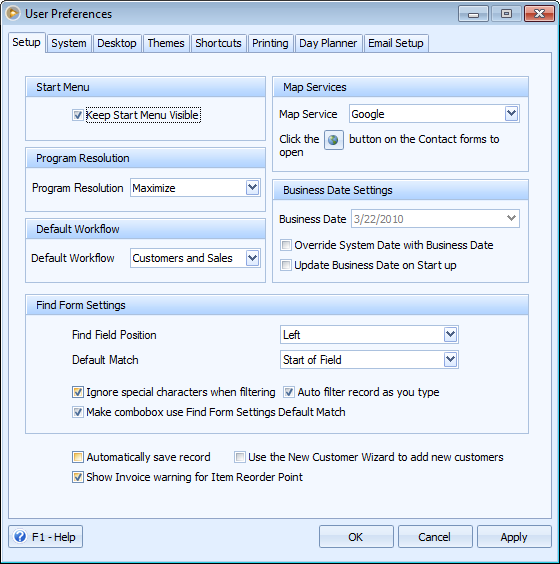
This tab lists several options that open other forms that are used to customize VisionCore. For additional information of these forms see their various topics.
Start Menu
![]() Keep Start Menu Visible
Keep Start Menu Visible
The Keep Start Menu Visible option is used to display the Start Menu when VisionCore Main Menu is opened. This form enables you to review form and report favorites; review scheduled activities; quick search for Customer/Prospect, Inventory, Receivable and Vendor, an overview of your monthly and yearly sales and review the system workflow.
Program Resolution
![]() Program resolution
Program resolution
The Program Resolution option is used to stretch all the forms to fill the full screen if your computer resolution is set higher than 640x480. Keep in mind that stretching forms like this may distort some of them in real high resolutions like 1280 X 1024. This option may NOT run correctly on all Computers, especially with certain video cards and Video drivers.
Map Services
![]() Map Services
Map Services
The Map Service Option enables you to choose a predefine search engine, namely: Google & Yahoo, to locate addresses via internet (when you click the colored globe button on the Address field of any form, provided that you have internet access and the address is completely filled in).
Find Form Settings
These options will establish your default settings for the Find form.
![]() Default Match
Default Match
This allows you to choose a default match to search and filter records. The options to choose from are Start Field, Any Part of field and Whole Field.
![]() Find Field Position
Find Field Position
This allows you to choose the position of the Find field, either left or right.
![]() Default records to retrieve
Default records to retrieve
This is where you can specify how many records the Find form will retrieve and display based on the search criteria entered in the Find form.
![]() Make combo box use Find Form Settings Default Match
Make combo box use Find Form Settings Default Match
This will enable the same settings setup in the Default Match for drop down combo box.
![]() Ignore special characters when filtering
Ignore special characters when filtering
When enabled will ignore special characters like punctuation mark, dash and even space when filtering.
![]() Use the New Customer Wizard to add new customer
Use the New Customer Wizard to add new customer
Enable this option to open the Customer Wizard every time you create a new customer.
![]() Automatically Save Record
Automatically Save Record
This will automatically save the record when closing the form or moving to the next record.
![]() Show Invoice warning for Item Reorder Point
Show Invoice warning for Item Reorder Point
When this option is enabled, an Invoice warning message will automatically appear once the quantity in stock for a certain product has dropped the Reorder Point specified in the Inventory form.
System Tab
General Startup Options
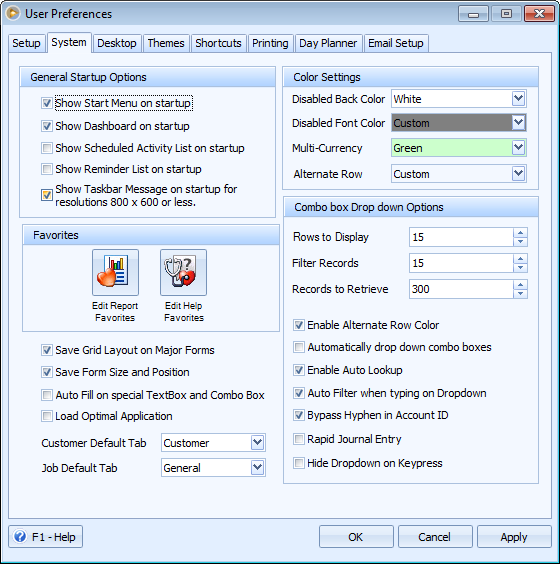
All of these options will display certain forms or messages when VisionCore first runs.
![]() Show Start Menu on startup
Show Start Menu on startup
This will display the Start Menu, which enables you to review form and report favorites; review scheduled activities; quick search for Customer/Prospect, Inventory, Receivable and Vendor, an overview of your monthly and yearly sales and review the system's workflow.
![]() Show Scheduled Activity List on startup
Show Scheduled Activity List on startup
This will display the Scheduled Activities List form, which will list any activities coming up.
![]() Show Reminder List on startup
Show Reminder List on startup
Displays the Reminder List form, which lists helpful reminders like any unposted transactions or inventory that needs to be ordered.
![]() Show Taskbar message on startup for resolutions 800 X 600 or less
Show Taskbar message on startup for resolutions 800 X 600 or less
This will display a warning message if the Windows Taskbar is set to "Always on Top". This is because VisionCore uses every part of the screen when in the 800 X 600 mode including the area where the Taskbar is. What happens when the Taskbar is set to "Always on Top" and your screen resolution is 800 X 600 is that the bottom section of all the forms will be covered up by the Taskbar. You can get around this by deselecting the Taskbar's "Always on Top" option or moving to a higher screen resolution like 1024 X 768.
Back Color Settings
These options will determine your default back color settings for multi-currency and alternate row.
![]() Multi-Currency
Multi-Currency
Enables you to select a default back color when multi-currency transaction is created.
![]() Alternate Row
Alternate Row
Enables you to select a default back color for alternate row in the grid area of the form.
Favorites
![]() Edit Form Favorites
Edit Form Favorites
This will open the Navigator Setup - Form Favorites form that enables you to select the forms you want to be displayed in the Start Menu.
![]() Edit Report Favorites
Edit Report Favorites
This will open the Navigator Setup - Report Favorites form that enables you to select the reports you want to be displayed in the Start Menu.
![]() Edit Help Favorites
Edit Help Favorites
This will open the Navigator Setup - Help Favorites form that enables you to select the help topics you want to be displayed in the Start Menu.
Combo box Drop down Options
![]() Rows to Display
Rows to Display
This will determine the default number of rows to be displayed in all combo boxes.
![]() Filter Records
Filter Records
This will determine the maximum number of records to be displayed when filtering records.
![]() Records to Retrieve
Records to Retrieve
This is where you can specify how many records to retrieve in combo boxes. To illustrate how this feature works, see Records to Retrieve
![]() Enable Alternate Row Color
Enable Alternate Row Color
This will allow you to set whether or not you would want the alternate Row Color option to be enabled.
![]() Automatically drop down combo boxes
Automatically drop down combo boxes
This will automatically display the drop down combo boxes on all combo box fields.
![]() Enable Auto Lookup checkbox
Enable Auto Lookup checkbox
This will enable automatic searching in the drop down boxes. To illustrate how this feature works, see Enable Auto Lookup.
![]() Save Grid Layout on Major Forms
Save Grid Layout on Major Forms
When enabled will save the modification/s made on grid layout in major forms (like Sales Order and Invoice forms). To illustrate how this feature works, see Save Grid Layout on Major Forms.
![]() Save Form Size and Position
Save Form Size and Position
If this option is selected, VisionCore will save the size of the particular form and its position the last time it was opened.
![]() Auto Fill on special TextBox and Combo Box
Auto Fill on special TextBox and Combo Box
![]() Load Optimal Application
Load Optimal Application
![]() Customer Default Tab
Customer Default Tab
The Customer Default Tab is used to assign a default tab for the Customer form. The selected tab's information will be displayed upon opening the Customer form.
![]() Job Default Tab
Job Default Tab
The Job Default Tab is used to assign a default tab for the Job form. The selected tab's information will be displayed upon opening the Job form.
Desktop Tab
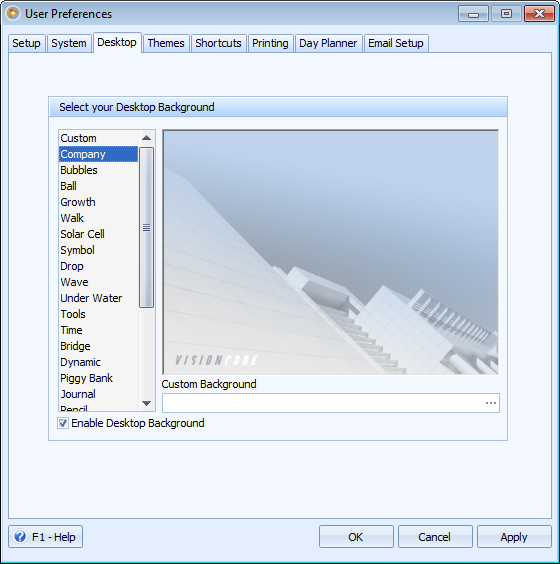
The Desktop Tab will give you the option of choosing what design you would like to decorate the desktop. You can choose from a list of available background designs found at the left side of the Preview window of the User Preference Form. You also have the option to customize your desktop background by selecting Custom at the left side of the Preview window. Then click the Ellipse button below the Preview window to look for background files in other folders. You may use files with these extensions: jpeg, gif, bmp and png.
Themes Tab
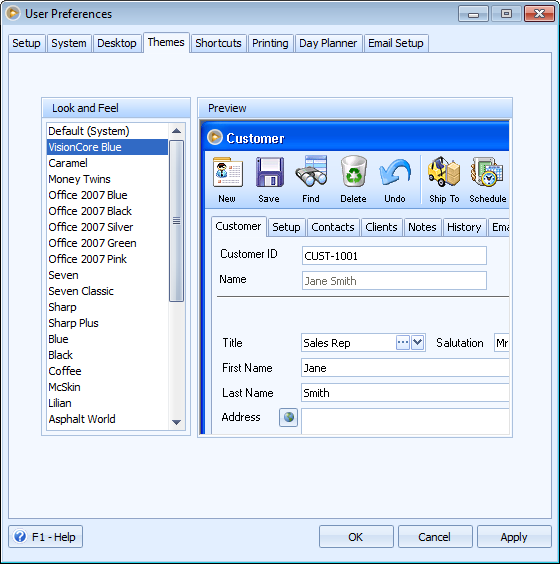
The Themes Tab will give you the option of choosing what design you would like to have as a theme. You can choose from a number of themes at the left side of the Preview window of the User Preference Form. The chosen theme will immediately replace the current theme you are using.
Shortcuts Tab
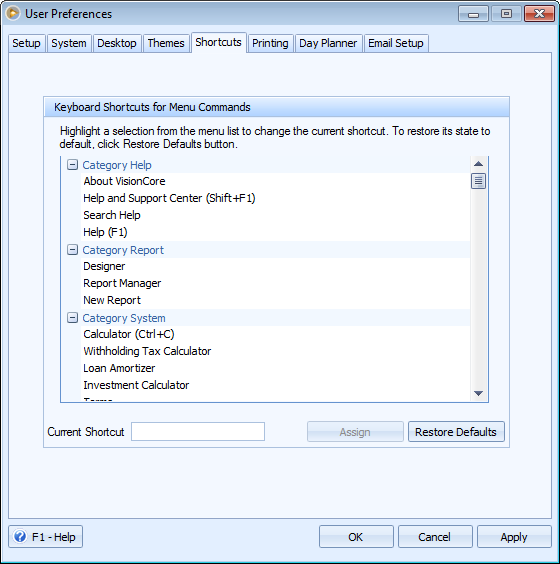
The Shortcuts Tab allows you to assign keyboard shortcuts for each form. Some of the forms have a predefined keyboard shortcut but you can change them if you want.
Printing Tab
Printing Options
![]() Number of Copies to Print
Number of Copies to Print
Enter the default number of copies you normally want printed when you print anything in the program.
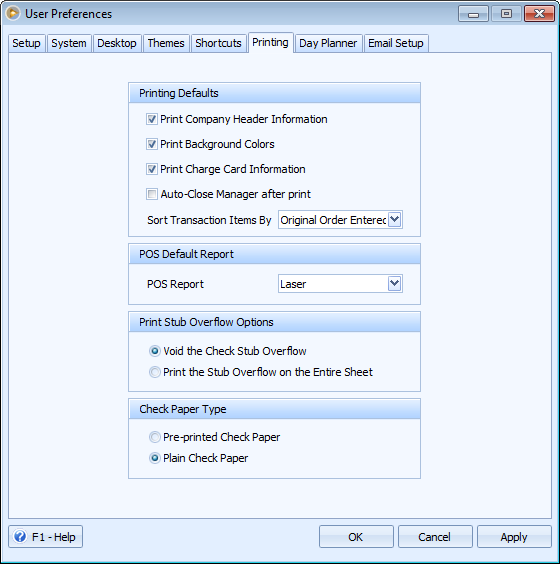
Printing Defaults
The Printing Defaults give you the option to customize the way your reports and invoices print.
![]() Print Company Header Information
Print Company Header Information
This will print your company information at the top left corner of every invoice and order. This is the same information that is entered in the Company Setup form.
![]() Print Background Colors
Print Background Colors
This will print a gray shaded background color in the Bill To and Ship To area of all printed invoices and orders. You will need a good laser printer to make the shaded background look good.
![]() Print Charge Card Information
Print Charge Card Information
This will print the customers charge card information at the bottom of the invoice or order.
![]() Auto-Close Manager after print
Auto-Close Manager after print
When this option is enabled, Report Manager will be closed after printing the report.
![]() Sort Transaction Items By
Sort Transaction Items By
This allows you to sort items in Reports by Item Number, Original Order Entered, Vendor ID or Category. To illustrate how this feature works, see Sort Transaction Items By.
POS Default Report
![]() POS Default Report
POS Default Report
The POS Report field allows you to select a size of default POS default report.
Day Planner Tab
Day Planner Settings
![]() Day Planner Resolution - is used to stretch the Day Planner form to fill the full screen if your computer resolution is set higher than 640x480. Keep in mind that stretching the Day Planner form like this may distort some of them in real high resolutions like 1280 X 1024. This option may NOT run correctly on all Computers, especially with certain video cards and Video drivers.
Day Planner Resolution - is used to stretch the Day Planner form to fill the full screen if your computer resolution is set higher than 640x480. Keep in mind that stretching the Day Planner form like this may distort some of them in real high resolutions like 1280 X 1024. This option may NOT run correctly on all Computers, especially with certain video cards and Video drivers.
![]() Open Day Planner on top of all other windows - This will display the Day Planner on top of other windows when opened.
Open Day Planner on top of all other windows - This will display the Day Planner on top of other windows when opened.
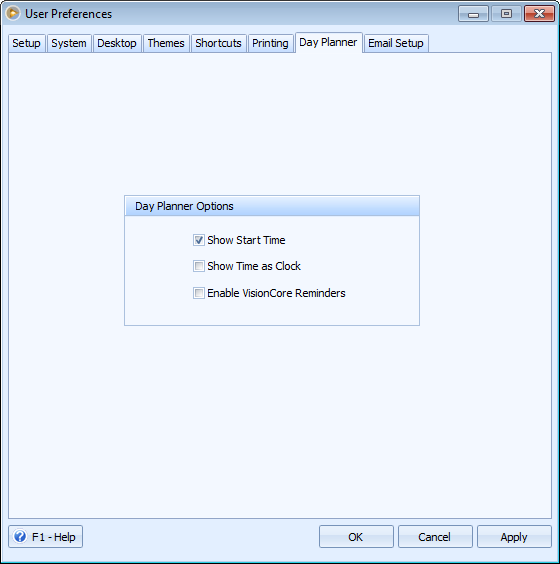
Day Planner Options
![]() Show Start Time - will display the scheduled start time of the activity in Monthly Planner form.
Show Start Time - will display the scheduled start time of the activity in Monthly Planner form.
![]() Show Time as Clock - will display the clock icon instead of the scheduled start time of the activity in Monthly Planner form.
Show Time as Clock - will display the clock icon instead of the scheduled start time of the activity in Monthly Planner form.
![]() Note that the Show Time as Clock option will only work if the Show Start Time is enabled.
Note that the Show Time as Clock option will only work if the Show Start Time is enabled.
E-mail Tab
Mail Server Information
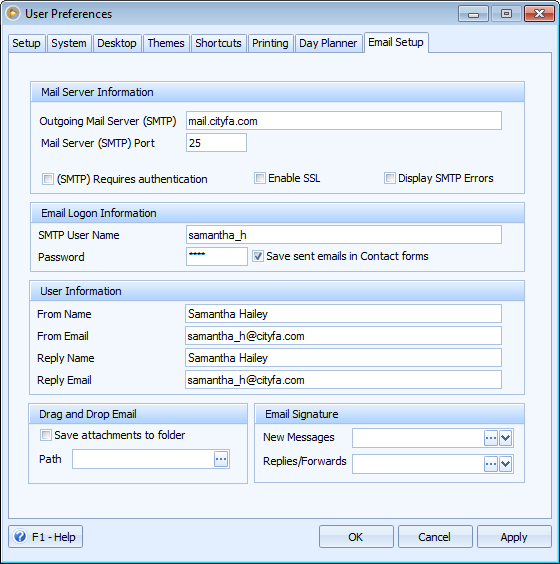
![]() Outgoing Mail Server (SMTP) - determines your Simple Mail Transfer Protocol (SMTP) server for outgoing messages.
Outgoing Mail Server (SMTP) - determines your Simple Mail Transfer Protocol (SMTP) server for outgoing messages.
![]() The Outgoing Mail Server (SMTP) are settings that your Internet Service Provider ISP or IT Professional should provide you with.
The Outgoing Mail Server (SMTP) are settings that your Internet Service Provider ISP or IT Professional should provide you with.
![]() (SMTP) Requires authentication - when selected will verify whether the mail server and e-mail are authenticated or valid. If one or both fail to meet this criteria, the email will not be sent.
(SMTP) Requires authentication - when selected will verify whether the mail server and e-mail are authenticated or valid. If one or both fail to meet this criteria, the email will not be sent.
![]() Display POP3 and SMTP Errors - when selected will display the POP3 and SMTP errors encountered when sending emails.
Display POP3 and SMTP Errors - when selected will display the POP3 and SMTP errors encountered when sending emails.
Email Logon Information
![]() SMTP Username and Password are settings that your ISP or IT Professional should provide you with.
SMTP Username and Password are settings that your ISP or IT Professional should provide you with.
![]() Save Sent e-mails in Contact forms - will save all the e-mails that you sent in Contact forms namely Customer, Prospect, Vendor, Sales Rep Group, Sales Rep, Employee and Jobs.
Save Sent e-mails in Contact forms - will save all the e-mails that you sent in Contact forms namely Customer, Prospect, Vendor, Sales Rep Group, Sales Rep, Employee and Jobs.
User Information
![]() From Name should list the User's Name as the user would like it to appear in an e-mail.
From Name should list the User's Name as the user would like it to appear in an e-mail.
![]() From E-mail should list the User's E-mail Address as the user would like it to appear in an e-mail.
From E-mail should list the User's E-mail Address as the user would like it to appear in an e-mail.
![]() Reply Name should list the name the user would like to appear in a reply from a sent e-mail. This could be Sales.
Reply Name should list the name the user would like to appear in a reply from a sent e-mail. This could be Sales.
![]() Reply Email should list the e-mail address where a reply to the e-mail should be sent. This might be sales@yourcompany.com.
Reply Email should list the e-mail address where a reply to the e-mail should be sent. This might be sales@yourcompany.com.
Drag and Drop E-mail
![]() Save attachments to folder - will save the attachment on the path provided next to it. Click the Ellipse button in the Path field to look for folders where you can save attachments.
Save attachments to folder - will save the attachment on the path provided next to it. Click the Ellipse button in the Path field to look for folders where you can save attachments.