V. Contractors/Contracts
1. Create new contractor.
To open Contractor form, go to Contacts menu > Contractors.
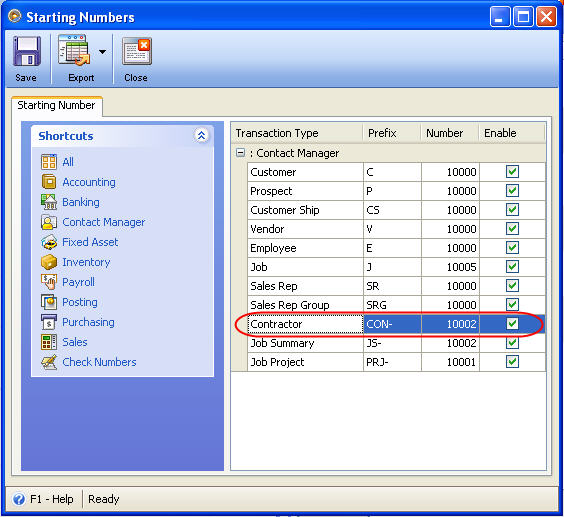
By Default, VisionCore will automatically assign a unique Contractor ID for each contractor. You may disable this automatic assigning of Contractor ID by going to the VisionCore program's Main Menu, clicking on the following: the Company Preferences, the General Tab, the Starting Numbers button, Contact Manager, click the little white box to the right of the Contractor ID field to uncheck it. With the Contractor ID field disabled, you may assign a unique Contractor ID.
Enter Contractor’s information you may have like Company Name, Registration No., First Name, and so on.
2. In the Job form - Contract tab, enter appropriate information like Contract No., Reference, Contract Dates, Contract Value, Contractor and so on.
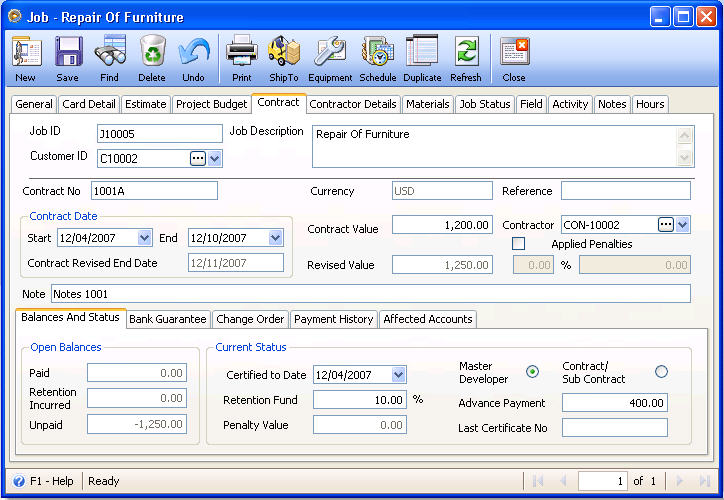
![]() Contract Value – The is where the user specifies the value of the contract for the job.
Contract Value – The is where the user specifies the value of the contract for the job.
![]() Contractor – this refers to the builder of the job. It is usually associated to a Vendor record.
Contractor – this refers to the builder of the job. It is usually associated to a Vendor record.
![]() Revised Value – If there are any changes in the value of the contract, the user should enter the changes on the Change Order tab, Revised value field. The revised amount from the grid is reflected in the Revised value text box.
Revised Value – If there are any changes in the value of the contract, the user should enter the changes on the Change Order tab, Revised value field. The revised amount from the grid is reflected in the Revised value text box.
![]() Applied Penalties – the user records here any additional penalties to the current contract value value. If there is a revised value, the penalty will use the revised value to compute the penalty.
Applied Penalties – the user records here any additional penalties to the current contract value value. If there is a revised value, the penalty will use the revised value to compute the penalty.
Balances and Status tab
You will be able to monitor Paid amounts, Retention Incurred and Unpaid balances in the Open Balances area.
![]() Retention Incurred – If the job is setup as a Master Developer, this field shows total retention amount from the posted Bills transactions associated for the job. If the job is setup as Contract/Sub-Contract, this field shows the total retention amount from the the posted Sales/Job Invoice transactions associated for the job. In the Current Status area, enter values for Certified Date, Retention Fund (in percent), Advance Payment and Last Certificate No.
Retention Incurred – If the job is setup as a Master Developer, this field shows total retention amount from the posted Bills transactions associated for the job. If the job is setup as Contract/Sub-Contract, this field shows the total retention amount from the the posted Sales/Job Invoice transactions associated for the job. In the Current Status area, enter values for Certified Date, Retention Fund (in percent), Advance Payment and Last Certificate No.
![]() Retention Fund – this fields allows the user to setup the rate of retention. For example, if the user setup 12% , this means 12% of the contract value is allocated as the retention amount.
Retention Fund – this fields allows the user to setup the rate of retention. For example, if the user setup 12% , this means 12% of the contract value is allocated as the retention amount.
![]() Penalty Value – If the job is setup as a Master Developer, this field shows total penalty amount from the posted Bills transactions associated for the job. If the job is setup as Contract/ Sub-Contract, this field shows the total penalty amount from the the posted Sales/Job Invoice transactions associated for the job.
Penalty Value – If the job is setup as a Master Developer, this field shows total penalty amount from the posted Bills transactions associated for the job. If the job is setup as Contract/ Sub-Contract, this field shows the total penalty amount from the the posted Sales/Job Invoice transactions associated for the job.
![]() Select Master Developer if you are the main developer. This option will allow you to create transactions like Jobs Bill, Inventory Issue, Inventory RMA, Job Transfer, Process Paycheck and Banking transactions using the Project Clause. When selected, this means the company will be the who main developer of job. This means the company can hire contractors/sub-contractors to finish a job.
Select Master Developer if you are the main developer. This option will allow you to create transactions like Jobs Bill, Inventory Issue, Inventory RMA, Job Transfer, Process Paycheck and Banking transactions using the Project Clause. When selected, this means the company will be the who main developer of job. This means the company can hire contractors/sub-contractors to finish a job.
![]() Select Contract/Sub Contract if you are the contractor or sub contractor. This option will allow you to create transactions like Jobs Invoice, Inventory Issue, Inventory RMA, Job Transfer, Process Paycheck and Process Invoice from Hours tab, and Banking transactions using the Project Clause. When selected, this means the company is hired to do the job.
Select Contract/Sub Contract if you are the contractor or sub contractor. This option will allow you to create transactions like Jobs Invoice, Inventory Issue, Inventory RMA, Job Transfer, Process Paycheck and Process Invoice from Hours tab, and Banking transactions using the Project Clause. When selected, this means the company is hired to do the job.
![]() Note that as a Master Developer, the company can hire contractors/sub-contractors to finish a job. This means they are paying other people to finish a job. Hence, the system only allows bills to be created to this kind of job. When a job is setup as a Contract/Sub-Contract, it means that the company was hired to do the job. Hence, the company is issuing a sales invoice to collect payments from the master developer.
Note that as a Master Developer, the company can hire contractors/sub-contractors to finish a job. This means they are paying other people to finish a job. Hence, the system only allows bills to be created to this kind of job. When a job is setup as a Contract/Sub-Contract, it means that the company was hired to do the job. Hence, the company is issuing a sales invoice to collect payments from the master developer.
![]() Advance Payment – amount paid in advance for the job.
Advance Payment – amount paid in advance for the job.
![]() Last Certificate No. – the payment certificate # posted from most recently posted the Invoice or Bill transaction.
Last Certificate No. – the payment certificate # posted from most recently posted the Invoice or Bill transaction.
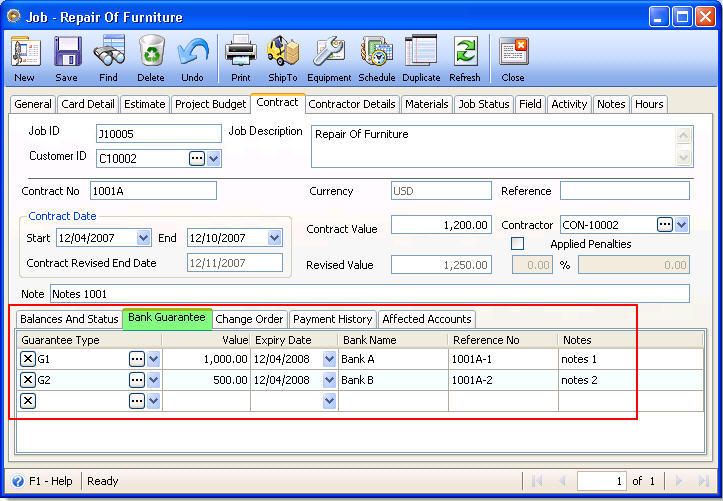
Bank Guarantee tab
The Bank Guarantee tab is for record keeping of deposited or funded amount on a certain bank.
Change Order Tab
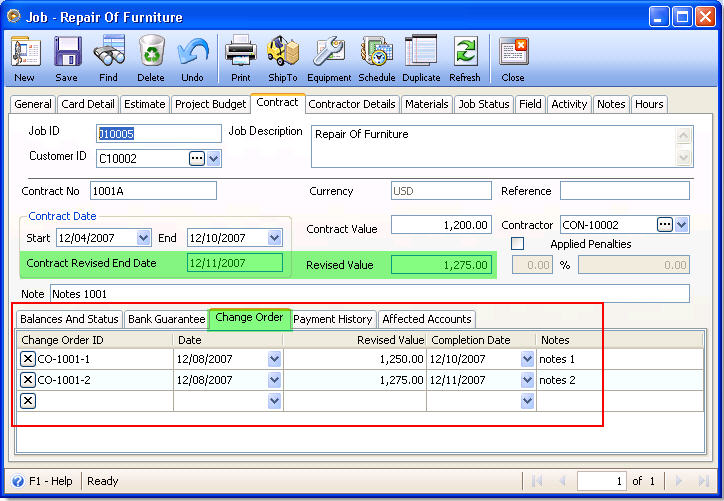
The Change Order tab is where you may enter new contract values. The latest added value will be the new contract value. Notice that as you enter a new line item on this tab, the Contract Revised End Date and Revised Value is updated in accordance to the added line item.
Payment History Tab
This tab will display all jobs bill or jobs invoice transactions for the selected job.
![]() Take note that Bills are for Master Developer while Invoices are for Contractors/Sub Contractors.
Take note that Bills are for Master Developer while Invoices are for Contractors/Sub Contractors.
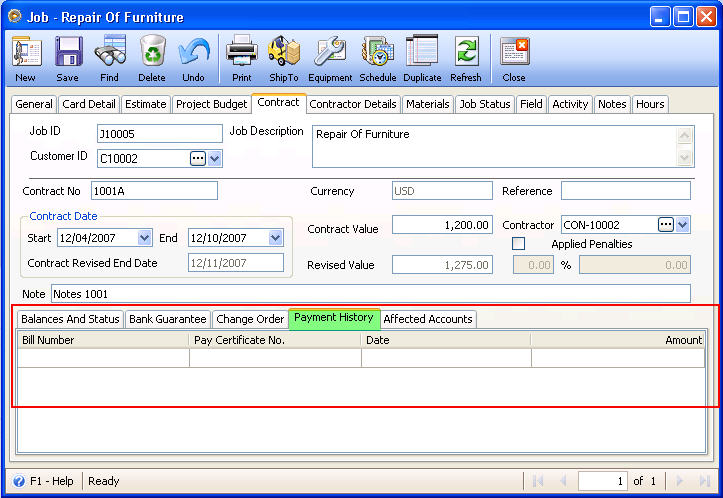
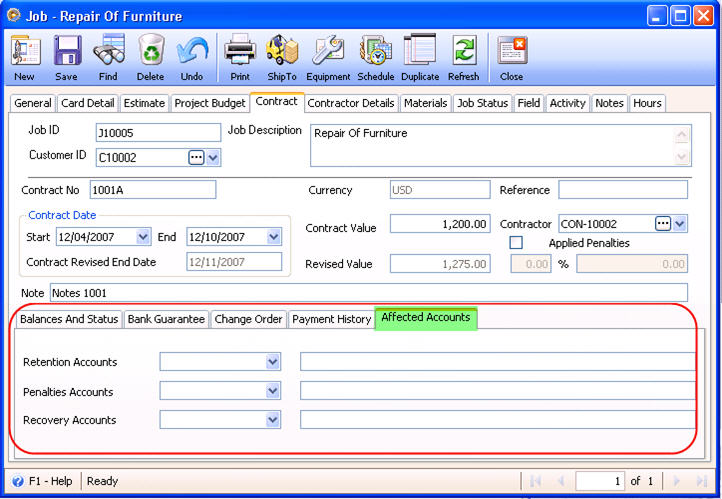
Affected Accounts Tab
This tab is where you enter affected accounts for the job bill or job invoice transactions involved in the contract.
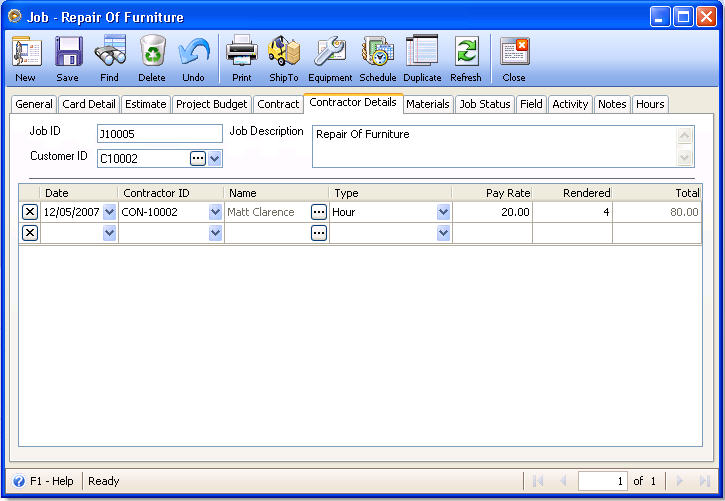
3. Job form - Contract Detail tab,
Select a contractor/s in the Contractor Details tab.
Enter Date and Contractor ID. The Contractor Name will automatically be filled in. Click the ellipse button in this field to open the contractor’s record.
In the Type combo box, you have the option to select Hour, Day, Week or Month. As you select a Type on this field, Pay Rate field will automatically be filled in with the amount you had set in the Contractor form.
In the Rendered field, enter the:
![]() Hours worked if Hour is selected in the Type field
Hours worked if Hour is selected in the Type field
![]() Days worked if Day is selected in the Type field
Days worked if Day is selected in the Type field
![]() Weeks worked if Week is selected in the Type field
Weeks worked if Week is selected in the Type field
![]() Months worked if Month is selected in the Type field
Months worked if Month is selected in the Type field
Total field is derived by multiplying the Pay Rate to the value entered in Rendered field.
Move to the next topic: Chapter VI : Job Information