Accounts Opening Balances
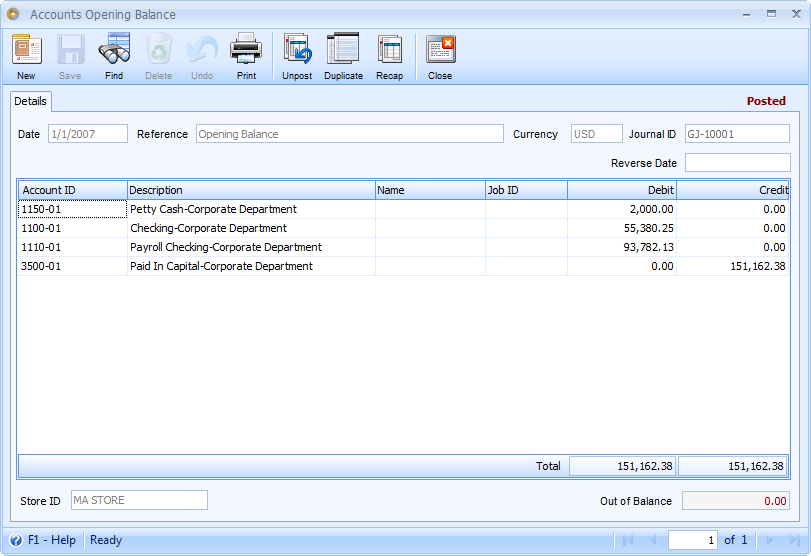
The Accounts Opening Balances are entered in the General Journal form. You normally enter opening balances for your chart of accounts when you are initially setting up a company data file and need to enter existing balances into different accounts.
![]() Note: If you are setting up opening balances for your Customers, Vendors, Inventory and Employee, you will not want to use the General Journal form, nor will you want to enter balances for Accounts Receivable, Accounts Payable, Inventory and Taxes, Deductions, Earnings and Time Offs balances. These balances should be entered in the other opening balance forms such as Customer Opening Balance, Vendor Opening Balance, Inventory Opening Balance and Employee Opening Balance forms, which will be discussed in Inventory, Customer, Vendor and Employee/Paycheck Opening Balances topics.
Note: If you are setting up opening balances for your Customers, Vendors, Inventory and Employee, you will not want to use the General Journal form, nor will you want to enter balances for Accounts Receivable, Accounts Payable, Inventory and Taxes, Deductions, Earnings and Time Offs balances. These balances should be entered in the other opening balance forms such as Customer Opening Balance, Vendor Opening Balance, Inventory Opening Balance and Employee Opening Balance forms, which will be discussed in Inventory, Customer, Vendor and Employee/Paycheck Opening Balances topics.

The following steps will explain in detail how to add a new Accounts Opening Balance.
1.From the Main Menu, click on System Manager, then Opening Balances. You will now be brought to the Opening Balances form. Here, click the Accounts Opening Balance button. This will open the Find Opening Balance Journal form. Click the New button at the upper left corner of the form to bring you to a cleared accounts opening balance form where you may enter your accounts opening balances.
2.Enter the date of the transaction. You can use the drop down arrow button to open the miniature calendar to graphically enter a date. When you have finished entering data for each field, press the TAB or ENTER key to move your cursor to the next field.
3.Since this is an opening balance transaction, the Reference field will display the words Opening Balance for easily tracking this transaction later on.
4.The Currency field is used to assign a currency to the general journal. Normally this will automatically fill in with your default Currency ID setup in the Company Preferences form.
5.The Journal ID will be automatically filled in with a unique number based on the starting number that is assigned in the Starting Numbers form. This number is used as a reference for you and VisionCore to help find this transaction later if necessary. It cannot be changed on this form but you can change the numbering sequence in the Starting Numbers form.
6.Next enter the Account ID you want to use by selecting from the combo box.
7.The Description field will automatically fill in with the accounts description but you can change it if you want.
8.The Name field can be used to reference a Customer ID or Vendor ID. If the selected Account ID is under the Account Group "Receivables" then you must enter a Customer ID in the Name field. If the selected Account ID is under the Account Group "Payables" then you must enter a Vendor ID in the Name field.
9.You can also enter a Job ID for tracking the journal entry to a Job.
10.Now you enter either a debit or a credit amount for the selected account. You can enter as many lines as you wish by going to a blank line and entering another Account ID and debit or credit. No matter what you do, you will need to balance this transaction when you are finished. ("Balanced" means having equal dollars in the debits and the credits) The Out of Balance field will display the amount you are out of balance and when you are finished entering all your debits and credits this field should display zero.
11.When you are finished entering all your transactions and the Out of Balance field is zero you can then Post this opening balance.