User Roles Setup
The User Roles form is used to store all the user roles you can select from the User Role combo box field in Security form. You can set this up to reflect whatever type of user access permissions you want to use. This serves as a template that can be used to quickly assign security permissions to a user. When you select a user role for the user, menu permissions, form permissions and form control permissions established for that user role will quickly be applied. Then of course, you can edit the security permissions as necessary.
This is completely optional but comes in very handy if you have many users all with several common security permissions. By default, there are four (4) predefined user roles such as Administrators, Custom User, Sales Rep User and POS User. The Administrator type automatically has the highest level of security with no restrictions and has the ability to control and assign what other users can and cannot do in the system. Normally there should only be one Administrator type and the rest are Users. Keep in mind that you will not be able to modify any settings in the Security form if you are not logged in as an Administrator user.
1. The Role Name field is a read-only field that shows the role name you assigned when you added the selected user role.
2. The Role Description field is used to enter a detailed description of the user role.
3. The Menu Permissions, Form Permissions and Form Control Permissions tabs give you the ability to control and assign what users can and cannot do in the system. Each tab is explained in details below.
Menu Permissions Tab
The Menu Permissions tab allows you to give or deny permission for users to specific menu, sub-menu or topic under a menu. This is a very powerful feature, because you can establish specific Permission Level for each and every user. You will see that all VisionCore menu, sub-menu and other menu items are displayed here and are arranged by module.
The quick search fields at the top of the form gives you the most flexible way to search for, or find the specific menu item you are looking for. Once you have narrowed your search down to the desired menu items, you proceed with setting the menu permissions.
Search fields
The Find field is an input field. As you type in every letter into this field, it automatically filters records that match the entered letter/s or word/s.
The Matching combo box field allows you to choose a default match to search and filter records. The options to choose from are Start Field, Any Part of field and Whole Field.
The In combo box field allows you to choose from the following search criteria: Menu Name, Menu, Menu Type, Permission and All Fields.
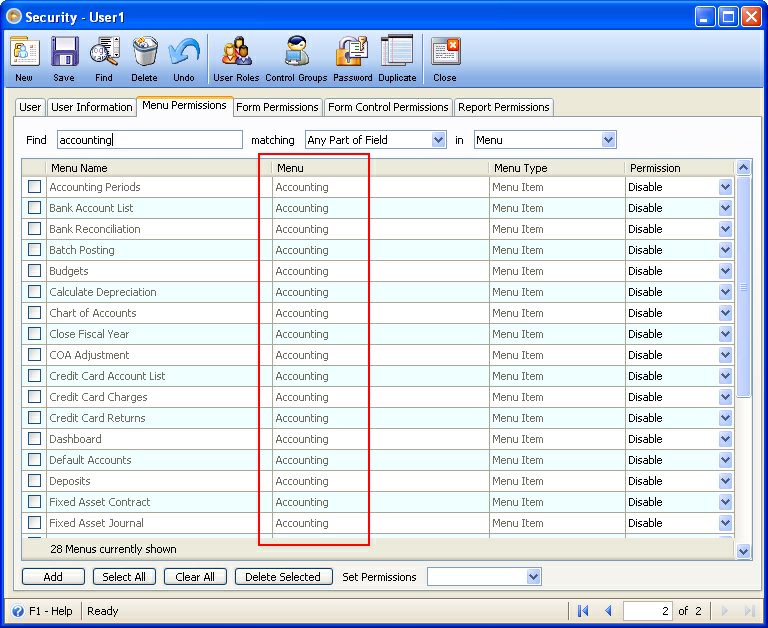
An example of using the quick menu search
If you would like to find all menu item under Accounting module, you would select Menu in the combo box field next to Matching field, then type Accounting in the field to the right of the word 'Find'. Now all menu items under Accounting will be filtered.

The Grid area is used to display all menus added. In here you can give or deny permission to specific menus.
Here are the Menu Permissions to choose from.
![]() Disable – the menu is disabled but visible
Disable – the menu is disabled but visible
![]() Hide – the menu is hidden and disabled
Hide – the menu is hidden and disabled
Buttons at the bottom of the form
![]() The Add button when clicked will open the Add Menu Permission form where you can select VisionCore menu, sub-menu and topics under a menu to be added on the Menu Permissions tab.
The Add button when clicked will open the Add Menu Permission form where you can select VisionCore menu, sub-menu and topics under a menu to be added on the Menu Permissions tab.
![]() The Select All button will select all items added on the Menu Permission tabs, and, if you select a permission from the Set Permission combo box field, you will automatically change all the permissions for the selected menus. Example, clicking Select All button then selecting Disable in Set Permissions field will change all the permissions for the selected menus to Disable.
The Select All button will select all items added on the Menu Permission tabs, and, if you select a permission from the Set Permission combo box field, you will automatically change all the permissions for the selected menus. Example, clicking Select All button then selecting Disable in Set Permissions field will change all the permissions for the selected menus to Disable.
![]() The Clear All button will clear or remove menus from being selected.
The Clear All button will clear or remove menus from being selected.
![]() The Delete Selected button will remove selected menus from displaying on Menu Permissions grid area.
The Delete Selected button will remove selected menus from displaying on Menu Permissions grid area.
The Set Permissions field at the bottom of the form is used to quickly set permission on all selected menus. You may also use the Permission drop down combo box to one-by-one set Permission to a menu.
Form Permissions Tab
The Form Permissions tab allows you to give or deny permission for users to specific forms. This is a very powerful feature, because you can establish specific Access Level for each and every user. You will see that all VisionCore forms are displayed here and are arranged by module.
The quick search fields at the top of the form gives you the most flexible way to search for, or find the specific forms you are looking for. Once you have narrowed your search down to the desired forms, you proceed with setting the form permissions.
Search fields
The Find field is an input field. As you type in every letter into this field, it automatically filters records that match the entered letter/s or word/s.
The Matching combo box field allows you to choose a default match to search and filter records. The options to choose from are Start Field, Any Part of field and Whole Field.
The In combo box field allows you to choose from the following search criteria: Form Name, Menu, Permission and All Fields.
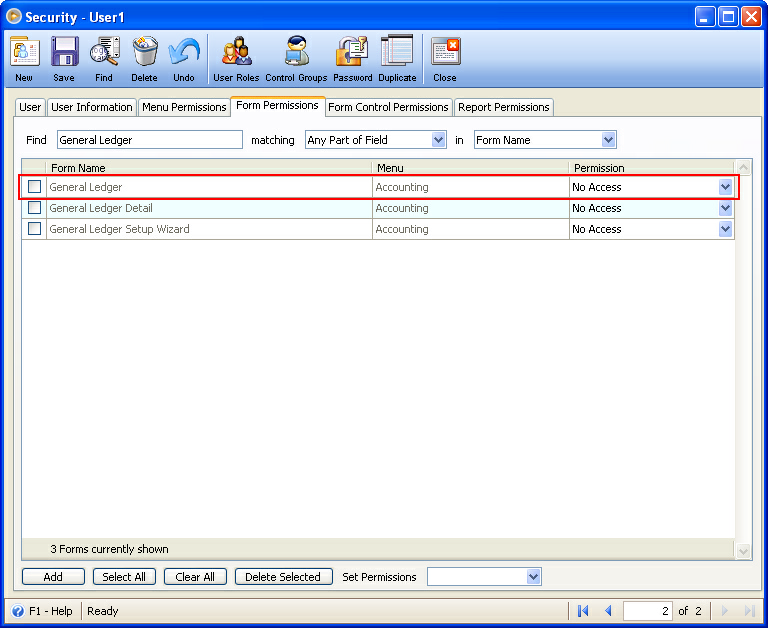
An example of using the quick menu search
If you would like to find General Ledger form, you would select Form Name in the combo box field next to Matching field, then type General Ledger in the field to the right of the word 'Find'. As you type General Ledger, form listings will automatically filter and show only forms that match the entered letter/s.

The Grid area is used to display all forms added. In here you can give or deny permission to specific forms.
Here are the Form Permissions to choose from.
![]() Full Access – allows all functions on Form’s data.
Full Access – allows all functions on Form’s data.
![]() No Access – allows no interaction on Form’s data. This means that no data will be loaded; adding and deleting will not be allowed.
No Access – allows no interaction on Form’s data. This means that no data will be loaded; adding and deleting will not be allowed.
![]() View Only – allows loading/viewing of data. Adding and deleting will not be allowed.
View Only – allows loading/viewing of data. Adding and deleting will not be allowed.
![]() Add – allows adding only
Add – allows adding only
![]() View/Add – allows all functions on Form's data, except deleting.
View/Add – allows all functions on Form's data, except deleting.
![]() Edit – allows editing only.
Edit – allows editing only.
Buttons at the bottom of the form
![]() The Add button when clicked will open the Add Form Permission form where you can select VisionCore forms to be added on the Form Permissions tab.
The Add button when clicked will open the Add Form Permission form where you can select VisionCore forms to be added on the Form Permissions tab.
![]() The Select All button will select all forms added on the Form Permissions tab, and, if you select a permission from the Set Permission combo box field, you will automatically change all the permissions for the selected forms. Example, clicking Select All button then selecting No Access in Set Permissions field will change all the permissions for the selected forms to No Access.
The Select All button will select all forms added on the Form Permissions tab, and, if you select a permission from the Set Permission combo box field, you will automatically change all the permissions for the selected forms. Example, clicking Select All button then selecting No Access in Set Permissions field will change all the permissions for the selected forms to No Access.
![]() The Clear All button will clear or remove forms from being selected.
The Clear All button will clear or remove forms from being selected.
![]() The Delete Selected button will remove selected forms from displaying on Form Permissions grid area.
The Delete Selected button will remove selected forms from displaying on Form Permissions grid area.
The Set Permissions field at the bottom of the form is used to quickly set permission on all selected forms. You may also use the Permission drop down combo box to one-by-one set Permission to a form.
Form Control Permissions Tab
The Form Control Permissions form allows you to give or deny permission for users to specific form controls. This is a very powerful feature, because you can establish specific permissions for each and every user. You will see that all VisionCore form controls are displayed here and are arranged by module. Form controls include Grid, Combo boxes, Toolbar buttons, Buttons, Text boxes, check boxes and radio buttons.
The quick search fields at the top of the form gives you the most flexible way to search for, or find the specific form controls you are looking for. Once you have narrowed your search down to the desired forms, you proceed with setting the form control permissions.
Search fields
The Find field is an input field. As you type in every letter into this field, it automatically filters records that match the entered letter/s or word/s.
The Matching combo box field allows you to choose a default match to search and filter records. The options to choose from are Start Field, Any Part of field and Whole Field.
The In combo box field allows you to choose from the following search criteria: Form Name, Control Type, Control Name, Module, Permission and All Fields.
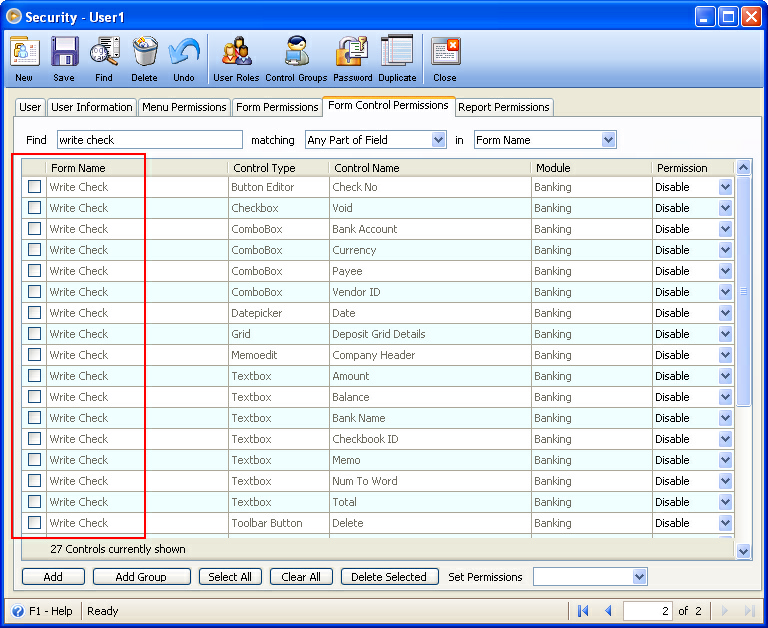
An example of using the quick menu search
If you would like to find all form controls form Write Checks form, you would select Form Name in the combo box field next to Matching field, then type Write Check in the field to the right of the word 'Find'. Now all form controls for Write Checks form will be filtered.

The Grid area is used to display all form controls added. In here you can give or deny permission to specific form controls.
Here are the Form Control Permissions to choose from.
![]() Disable – the control is disabled but visible
Disable – the control is disabled but visible
![]() Hide – the control is hidden and disabled
Hide – the control is hidden and disabled
![]() Bypass – the control is skipped through during “Tabbing” but is still enabled
Bypass – the control is skipped through during “Tabbing” but is still enabled
Buttons at the bottom of the form
![]() The Add button when clicked will open the Add Form Control Permission form where you can select VisionCore form controls to be added on the Form Control Permissions tab.
The Add button when clicked will open the Add Form Control Permission form where you can select VisionCore form controls to be added on the Form Control Permissions tab.
![]() The Add Group button when clicked will open the Add Form Control Permission form where you can select control group permissions that are previously added. So before you can select a control group you will have to create it first from User Control Groups form. This form can be opened by clicking Control Groups button on top of the Security form.
The Add Group button when clicked will open the Add Form Control Permission form where you can select control group permissions that are previously added. So before you can select a control group you will have to create it first from User Control Groups form. This form can be opened by clicking Control Groups button on top of the Security form.
![]() The Select All button will select all form controls added on the Form Control Permissions tab, and, if you select a permission from the Set Permission combo box field, you will automatically change all the permissions for the selected form controls. Example, clicking Select All button then selecting Disable in Set Permissions field will change all the permissions for the selected forms to Disable.
The Select All button will select all form controls added on the Form Control Permissions tab, and, if you select a permission from the Set Permission combo box field, you will automatically change all the permissions for the selected form controls. Example, clicking Select All button then selecting Disable in Set Permissions field will change all the permissions for the selected forms to Disable.
![]() The Clear All button will clear or remove form controls from being selected.
The Clear All button will clear or remove form controls from being selected.
![]() The Delete Selected button will remove selected form controls from displaying on Form Control Permissions grid area.
The Delete Selected button will remove selected form controls from displaying on Form Control Permissions grid area.
The Set Permissions field at the bottom of the form is used to quickly set permission on all selected form controls. You may also use the Permission drop down combo box to one-by-one set Permission to a form control.
To add new user role, simply click the New button at the top of this form. In case you would want to edit a particular user role, simply make your changes and save. If you want to apply the current changes made on the specific user role to all users using that user role, click Apply button.
Toolbar Buttons
Toolbar Buttons perform an action on the current record like adding, deleting or saving.
![]() The New button will open the Add New User Role form, where you may enter new user role.
The New button will open the Add New User Role form, where you may enter new user role.
![]() The Save button will save the selected user role.
The Save button will save the selected user role.
![]() The Delete button will delete the selected user role.
The Delete button will delete the selected user role.
![]() The Find button will enable you to Find User Roles.
The Find button will enable you to Find User Roles.
![]() The Undo button will cancel out the last change/s done to the record reverting it to its older state.
The Undo button will cancel out the last change/s done to the record reverting it to its older state.
![]() Click Apply to Users button if you want to apply current security permissions to all users using the selected User Role. For example, you changed Sales Rep Users Full-Access ability on Customer form to View-Only. When you click the apply to users button, the said change/s will be reflected on all users that are setup as Sales Rep Users.
Click Apply to Users button if you want to apply current security permissions to all users using the selected User Role. For example, you changed Sales Rep Users Full-Access ability on Customer form to View-Only. When you click the apply to users button, the said change/s will be reflected on all users that are setup as Sales Rep Users.
![]() The Close button will close the User Roles form.
The Close button will close the User Roles form.
Press F1 or click F1-Help button at the bottom left corner of the form for help on what this form is all about.