Security
This form is the control center for the security of VisionCore. It is here that you establish the users, their passwords, their permissions and settings. Each area is described in greater detail below and grouped by their tab names.
Settings tab
The Settings tab displays basic security information like User ID, Full Name, User Role and Description. Override Password Settings, Password Expiration, User Options and Email Password information are also shown and configured in this tab.
Fields at the top of the form
1. The User ID field is read only and will display the User ID added when you created the user.
2. The Full Name field is read only and will display the name entered in the User Profile tab > User Profile area > Full Name field.
3. The Override Password field will show ‘Enable for Administrator Only’ if the particular user is set to have user rights like POS User, Sales Rep User, Custom User or any other created user role. While the Change Override Password button will be shown if the user is set to have Administrator rights. If you want to change the Override Password, click that button and enter the new password. By the way, this password will work with override options under Override Password Settings area.
4. The User Role field can be set to Administrator, Custom User, Sales Rep User, POS User or any other created user role. The Administrator type automatically has the highest level of security with no restrictions. Normally there should only be one Administrator type and the rest Users. Keep in mind that you will not be able to modify any settings in the Security form if you are not logged in as User with Administrator user role. If you need to add a new user role, click on the ellipse button on this field to open the User Roles form and add it.
5. The Description field displays the description for every user role.
Override Password Settings
The Override Password Settings area allows for global security options, which will require when selected, a password each time the specified action is attempted.
1. Customer Credit Hold (Orders/Invoices) - When you enable this check box, the Credit Hold field is enabled in the Customer form for a particular customer. This will require you to enter a password for that customer to create any add sales or service transactions. This is important if you want to be able to prevent your employees from entering transactions for customers that are on a Credit Hold or above their assigned Credit Limit. You will also be required to enter the assigned password to disable the Credit Hold check box field or change the Credit Limit amount field for that customer in the Customer form. Also any add customers created while the Customer Credit Holds option is enabled will automatically enable the Credit Hold check box field for that customer. This will force a supervisor or administrator to have to approve all add customers being entered into the system. There will be a default password of '1234' assigned to the Customer Credit Hold item when you first enable it.
2. Sales Price Override (Orders/Invoices) - When you enable this check box, VisionCore will require a password to edit, or change the Customer Sales price in Sales Order and Sales Invoice. There will be a default password of '1234' assigned to the Customer Sales Price item when you first enable it.
3. Minimum Margin Override - When you enable this check box, you will be required to enter the password every time you try to sell the item for less than the assigned Minimum Profit Margin set in Company Preferences form > Inventory Tab. There will be a default password of '1234' assigned to the Minimum Margin Override item when you first enable it.
4. Low Sold Price Override - When you enable this checkbox, you will be required to enter the assigned password every time you try to sell an item for less than the previous sales price. This will be based on ALL the Customer’s previous sales transactions of that item. The system would look up the lowest price the particular customer ever paid in the past on a posted Invoice. There will be a default password of '1234' assigned to the Low Sold Price item when you first enable it.
Password Expiration
1.The Enable Expiration check box allows you to set whether or not an account is to have an expiration date.
2.When Enable Expiration checkbox is checked, Expiration Date will be visible.
Setting an Expiration Date can be useful if you only want a user to be setup for a temporary period of time. If you want the User to be active forever then uncheck the Enable Expiration check box. If the date you created is older than the systems date then that user will no longer be active and will lose the ability to login or use the program under that user name. You can use the drop down button to the right of this field to graphically enter an expiration date.
User Options
1.The User must change password on next log on check box when selected will require to change the password the next time the user logs on.
2.The User cannot change password check box when selected will restrict the user from changing the password.
3.The User is disabled check box when selected will mark the user as inactive and will lose the ability to login or use the program under that user name.
4.The Allow Remember Password checkbox when enabled will have that same option shown in Sign In form and will retain the user's password as well. See: How Remember Password works
Email Password
1. The Email Address field allows you to enter an e-mail address that will be used for retrieving user name and password.
User Profile tab
This is where default values and User Profile are configured. The Workstation Specification area shows read-only fields that hold information about your workstation specs.
The following will explain in detail the Default Values area. Other areas and User Profile areas are self-explanatory.
1. The POS Customer field is where you can set the default POS Customer that will be used every time the user creates POS transaction. Clicking the the drop down arrow on this field will show all customers added to the Customer form. Clicking the ellipse button will open the Customer record. Say this field is blank, clicking the ellipse button will allow you to create a new customer.
2. The POS Report field is where you can set a type of POS report to print on POS transactions. Choices are POS Sales Receipt and POS Sales Receipt (3-inch)
3. The Store ID field is where you can set the default Store ID that will be used every time the user creates POS transaction. Clicking the drop down arrow on this field will show all store IDs added to the Store form. Clicking the ellipse button will open the Store record. Say this field is blank, clicking the ellipse button will allow you to create a new store .
Default Accounts Tab
It is IMPORTANT that you spend time going through each of your account setup to make sure that those are setup correctly for your business. The following paragraphs will explain in detail what Defaults Accounts can do and how it can be managed.
The Default Accounts is used to assign default Account ID's from the Chart of Accounts to key areas of the program. By setting up the default accounts, VisionCore will automatically fill in these accounts when creating transactions throughout the program. Setting Default Accounts is necessary to ensure that particular Accounts are used in the important and required Account ID fields throughout the program. All of your default accounts can be set up from this form.
Setting your default accounts help speed up data entry when you are adding a new transaction. All the vital account codes will fill in automatically for you. If you want, you can override the default Account ID directly in the actual transaction form.
Your Default Accounts are set up when you create a new company database. You can click on the down arrow to review your Chart of Accounts and to select the Account ID that is to be used as a Default.
You will not be able to delete an account in the Chart of Accounts that is set as a Default Account. If you need to delete one of these accounts, you must first create a new Account ID. Then, change the Default Account to this newly created Account. Once that has been done, you will be able to delete the Account ID that was previously a Default Account.
![]() Note that Comtech Solutions strongly recommends to populate all the fields in Security form > Default Accounts tab.
Note that Comtech Solutions strongly recommends to populate all the fields in Security form > Default Accounts tab.
At the top of the Default Accounts tab there is the Account Template field where you can select a pre-defined default accounts setup. Click on the ellipse button on this field to open the Default Account Templates form where you can add, edit, duplicate, export and even import default account template. This can be very helpful of you are creating another user and you would want the same set of default accounts, saving you time from adding it all over again. Use the Update Users button if you would want the changes on the selected default account template be applied to users that use the said default account template.
Sales
![]() Accounts Receivable - Normally set to an Asset account and is used in the sales and service transaction forms to track Accounts Receivables. The A/R Account combo box field in the sales or service transaction forms will automatically be filled in with the account specified in this field. This will track the amount of the total field at the bottom of the sales or service transaction forms in the General Ledger using the Accounts Receivables Account ID entered in this field.
Accounts Receivable - Normally set to an Asset account and is used in the sales and service transaction forms to track Accounts Receivables. The A/R Account combo box field in the sales or service transaction forms will automatically be filled in with the account specified in this field. This will track the amount of the total field at the bottom of the sales or service transaction forms in the General Ledger using the Accounts Receivables Account ID entered in this field.
![]() Freight - Normally set to a Revenue account and is used in the sales and service transactions to track the amount of the Freight field at the bottom of the form.
Freight - Normally set to a Revenue account and is used in the sales and service transactions to track the amount of the Freight field at the bottom of the form.
![]() Customer Tax Code - Set to the default Tax Code that will automatically be entered into the Tax Code combo box field on all sales and service transactions. This will also be the default Tax Code assigned to the Tax Code combo box field on the Customer form when creating a new customer. You should create your tax codes in the Tax Codes [Sales] form before setting up a default code.
Customer Tax Code - Set to the default Tax Code that will automatically be entered into the Tax Code combo box field on all sales and service transactions. This will also be the default Tax Code assigned to the Tax Code combo box field on the Customer form when creating a new customer. You should create your tax codes in the Tax Codes [Sales] form before setting up a default code.
![]() Receivable Discounts - Normally set to an Expense account and is used in the sales and service transactions to track any discount given to a customer.
Receivable Discounts - Normally set to an Expense account and is used in the sales and service transactions to track any discount given to a customer.
![]() Discount on Invoices - Normally set to a Cost of Sales account and is used in the sales and service transactions to track the offset to the Receivable Discounts.
Discount on Invoices - Normally set to a Cost of Sales account and is used in the sales and service transactions to track the offset to the Receivable Discounts.
Purchases
![]() Accounts Payable - Normally set to a Liability account and is used in the purchase transaction forms to track Accounts Payable. The A/P Account combo box field in the purchase transaction forms will automatically be filled in with the account specified in this field. This will track the amount of the total field at the bottom of the purchase transaction forms in the General Ledger using the Accounts Payable Account ID entered in this field.
Accounts Payable - Normally set to a Liability account and is used in the purchase transaction forms to track Accounts Payable. The A/P Account combo box field in the purchase transaction forms will automatically be filled in with the account specified in this field. This will track the amount of the total field at the bottom of the purchase transaction forms in the General Ledger using the Accounts Payable Account ID entered in this field.
![]() Freight - Normally set to a Cost of Sales account and is used in the purchase transactions to track the amount of the Freight field at the bottom of the form.
Freight - Normally set to a Cost of Sales account and is used in the purchase transactions to track the amount of the Freight field at the bottom of the form.
![]() Vendor Tax Code - Set to the default Tax Code that will automatically be entered into the Tax Code combo box field on all purchase transactions. This will also be the default Tax Code assigned to the Tax Code combo box field on the Vendor form when creating a new vendor. You should create your sales tax codes in the Tax Codes [Purchasing] form before setting up a default code.
Vendor Tax Code - Set to the default Tax Code that will automatically be entered into the Tax Code combo box field on all purchase transactions. This will also be the default Tax Code assigned to the Tax Code combo box field on the Vendor form when creating a new vendor. You should create your sales tax codes in the Tax Codes [Purchasing] form before setting up a default code.
![]() Payable Discounts - Normally set to an Expense account and is used in purchase transactions to track any discounts given to you from a vendor.
Payable Discounts - Normally set to an Expense account and is used in purchase transactions to track any discounts given to you from a vendor.
![]() Discount on Bills - Normally set to a Revenue account and is used in purchase transactions to track the offset to the Payable Discounts.
Discount on Bills - Normally set to a Revenue account and is used in purchase transactions to track the offset to the Payable Discounts.
Inventory Tab
![]() Sales - Normally set to a Revenue account and used in the Inventory form for tracking sales income on any inventory item sold.
Sales - Normally set to a Revenue account and used in the Inventory form for tracking sales income on any inventory item sold.
![]() Inventory - Normally set to an Asset account and used in the Inventory form for tracking the cost of inventory on any inventory item sold or purchased.
Inventory - Normally set to an Asset account and used in the Inventory form for tracking the cost of inventory on any inventory item sold or purchased.
![]() Cost of Sales - Normally set to a Cost of Sales account and used in the Inventory form for tracking the cost of inventory items sold. It is the offset account for the Inventory account.
Cost of Sales - Normally set to a Cost of Sales account and used in the Inventory form for tracking the cost of inventory items sold. It is the offset account for the Inventory account.
![]() Inventory Gain/Loss - Normally set to an Expense account and is used behind the scenes of a Debit Memo when an inventory item is returned to a vendor at a higher or lower price than purchased. This is only used with Average Costing.
Inventory Gain/Loss - Normally set to an Expense account and is used behind the scenes of a Debit Memo when an inventory item is returned to a vendor at a higher or lower price than purchased. This is only used with Average Costing.
![]() Tax Exempt Code (Sales) - Normally set to NONE and used in the Quotes, Orders and Invoices if the Taxable check box is disabled in Inventory form, Setup Tab .
Tax Exempt Code (Sales) - Normally set to NONE and used in the Quotes, Orders and Invoices if the Taxable check box is disabled in Inventory form, Setup Tab .
![]() Tax Exempt Code (Purchase) - Normally set to NONE and used in Purchase Orders and Purchase Receipts if the Taxable check box is disabled in Inventory form, Setup tab.
Tax Exempt Code (Purchase) - Normally set to NONE and used in Purchase Orders and Purchase Receipts if the Taxable check box is disabled in Inventory form, Setup tab.
Receivables Tab
![]() Accounts Receivable - Normally set to an Asset account and used in the Receivables form to offset the Accounts Receivable account used on the sales or service transactions.
Accounts Receivable - Normally set to an Asset account and used in the Receivables form to offset the Accounts Receivable account used on the sales or service transactions.
![]() Deposit Account - Normally set to an Asset account and used in the Receivables form for tracking the account you will deposit collected funds into.
Deposit Account - Normally set to an Asset account and used in the Receivables form for tracking the account you will deposit collected funds into.
![]() Finance Charge - Normally set to a Revenue account and used in the Receivables form for tracking any Finance Charges collected.
Finance Charge - Normally set to a Revenue account and used in the Receivables form for tracking any Finance Charges collected.
![]() Customer Prepayment - Normally set to an Asset account and used in the Customer Prepayments form for tracking the your customer advanced deposits, or prepayments.
Customer Prepayment - Normally set to an Asset account and used in the Customer Prepayments form for tracking the your customer advanced deposits, or prepayments.
Payables Tab
![]() Accounts Payable - Normally set to a Liability account and used in the Payables form to offset the Accounts Payable account used on purchase transactions.
Accounts Payable - Normally set to a Liability account and used in the Payables form to offset the Accounts Payable account used on purchase transactions.
![]() Payment Account - Normally set to an Asset account and used in the Payables form for tracking the account you will use to pay your purchases.
Payment Account - Normally set to an Asset account and used in the Payables form for tracking the account you will use to pay your purchases.
![]() Payable Interest - Normally set to an Expense account and used in the Payables form for tracking any Interest paid.
Payable Interest - Normally set to an Expense account and used in the Payables form for tracking any Interest paid.
![]() Vendor Prepayment - Normally set to an Asset account and used in the Vendor Prepayments form for tracking the account you will store any vendor advanced deposits paid.
Vendor Prepayment - Normally set to an Asset account and used in the Vendor Prepayments form for tracking the account you will store any vendor advanced deposits paid.
POS (Point of Sale)
![]() Accounts Receivable - Normally set to an Asset account and used in the POS form to offset the Accounts Receivable account used on the point of sale transactions.
Accounts Receivable - Normally set to an Asset account and used in the POS form to offset the Accounts Receivable account used on the point of sale transactions.
![]() Freight - Normally set to a Revenue account and is used in the point of sales transactions to track the amount of the Freight field at the bottom of the form.
Freight - Normally set to a Revenue account and is used in the point of sales transactions to track the amount of the Freight field at the bottom of the form.
![]() Receivable Discounts - Normally set to an Expense account and is used in the point of sales transactions to track any discounts given to a customer.
Receivable Discounts - Normally set to an Expense account and is used in the point of sales transactions to track any discounts given to a customer.
![]() Deposit Account - Normally set to an Asset account and used in the POS form for tracking the account you will deposit collected funds into.
Deposit Account - Normally set to an Asset account and used in the POS form for tracking the account you will deposit collected funds into.
Banking Tab
![]() Checkbook - Normally set to an Asset account and used in the Banking forms as the default bank account used to make payments or deposits from.
Checkbook - Normally set to an Asset account and used in the Banking forms as the default bank account used to make payments or deposits from.
![]() Credit Card - Normally set to a Liability account and used in the Credit Card forms as the default credit card account used to make payments or charges from.
Credit Card - Normally set to a Liability account and used in the Credit Card forms as the default credit card account used to make payments or charges from.
![]() Service Charges - Normally set to an Expense account and used in the Bank Reconciliation form for tracking any service charges incurred on your bank account.
Service Charges - Normally set to an Expense account and used in the Bank Reconciliation form for tracking any service charges incurred on your bank account.
![]() Interest - Normally set to an Revenue account and used in the Bank Reconciliation form for tracking any interest received for your bank account.
Interest - Normally set to an Revenue account and used in the Bank Reconciliation form for tracking any interest received for your bank account.
Equity Tab
![]() Retained Earnings - Normally set to an Equity account and used in the Fiscal Year Periods form for holding the balance of the Current Year Earnings.
Retained Earnings - Normally set to an Equity account and used in the Fiscal Year Periods form for holding the balance of the Current Year Earnings.
![]() Current Year Earnings - Normally set to a Equity account and used in the Chart of Accounts form to display your earnings for the current year.
Current Year Earnings - Normally set to a Equity account and used in the Chart of Accounts form to display your earnings for the current year.
![]() Historical Balance - Normally set to an Equity account and used in the Chart of Accounts Opening Balance form to track the offset of any opening Account balances entered.
Historical Balance - Normally set to an Equity account and used in the Chart of Accounts Opening Balance form to track the offset of any opening Account balances entered.
Payroll Tab
![]() Bank Account - Normally set to an Asset account.
Bank Account - Normally set to an Asset account.
![]() Employee Taxes - Normally set to a Liability account.
Employee Taxes - Normally set to a Liability account.
![]() Company Taxes - Normally set to an Expense account.
Company Taxes - Normally set to an Expense account.
![]() State Tax - Normally set to a Liability account.
State Tax - Normally set to a Liability account.
![]() Earnings - Normally set to an Expense account.
Earnings - Normally set to an Expense account.
![]() Deductions - Normally set to a Liability account.
Deductions - Normally set to a Liability account.
![]() Time Off - Normally set to a Liability account.
Time Off - Normally set to a Liability account.
Misc Tab
![]() Misc Income - Normally set to a Revenue account used as a default miscellaneous income account. This account is mostly used when entering service transactions using only the description line item Line Item Detail display as the default Revenue account.
Misc Income - Normally set to a Revenue account used as a default miscellaneous income account. This account is mostly used when entering service transactions using only the description line item Line Item Detail display as the default Revenue account.
![]() Misc Expense - Normally set to an Expense account used in the Vendors form Expense combo box field. This is the default Account ID used in the Line Item Detail area of the Bills form. When you create a new vendor the Expense field will fill in with the Misc Expense value from the Default Accounts form. Each Vendor has their own default Expense Account ID, which you can change if you wish.
Misc Expense - Normally set to an Expense account used in the Vendors form Expense combo box field. This is the default Account ID used in the Line Item Detail area of the Bills form. When you create a new vendor the Expense field will fill in with the Misc Expense value from the Default Accounts form. Each Vendor has their own default Expense Account ID, which you can change if you wish.
![]() Sales Tax for Sales - Normally set to a Liability account used as a default account for sales tax received. Used in the Tax Codes [Sales] form.
Sales Tax for Sales - Normally set to a Liability account used as a default account for sales tax received. Used in the Tax Codes [Sales] form.
![]() Sales Tax for Purchases - Normally set to an Expense account used as a default account for sales tax paid. Used in the Tax Codes [Purchasing] form.
Sales Tax for Purchases - Normally set to an Expense account used as a default account for sales tax paid. Used in the Tax Codes [Purchasing] form.
Related Topics:
Missing Fields Warning Message in Default Accounts
Form Permissions Tab
The Form Permissions tab allows you to give or deny permission to users to specific forms. This is a very powerful feature, because you can establish specific Access Level for each and every user. You will see that all VisionCore forms are displayed here and are arranged by module.
Buttons at the top of the form
![]() The Add button when clicked will open the Add Form Permission form where you can select VisionCore forms to be added on the Form Permissions tab.
The Add button when clicked will open the Add Form Permission form where you can select VisionCore forms to be added on the Form Permissions tab.
![]() The Select All button will select all forms added on the Form Permissions tab, and, if you select a permission from the Set Permission combo box field, you will automatically change all the permissions for the selected forms. Example, clicking Select All button then selecting No Access in Set Permissions field will change all the permissions for the selected forms to No Access.
The Select All button will select all forms added on the Form Permissions tab, and, if you select a permission from the Set Permission combo box field, you will automatically change all the permissions for the selected forms. Example, clicking Select All button then selecting No Access in Set Permissions field will change all the permissions for the selected forms to No Access.
![]() The Clear All button will clear or remove forms from being selected.
The Clear All button will clear or remove forms from being selected.
![]() The Delete Selected button will remove selected forms from displaying on Form Permissions grid area.
The Delete Selected button will remove selected forms from displaying on Form Permissions grid area.
The Set Permissions field at the upper right corner of the form is used to quickly set permission on all selected forms. You may also use the Permission drop down combo box to one-by-one set Permission to a form.
The quick search fields at the bottom of the form gives you the most flexible way to search for, or find the specific forms you are looking for. Once you have narrowed your search down to the desired forms, you proceed with setting form permissions.
Search fields
The Filter field is an input field. As you type in every letter into this field, it automatically filters records that match the entered letter/s or word/s.
The Matching combo box field allows you to choose a default match to search and filter records. The options to choose from are Start Field, Any Part of field and Whole Field.
The In combo box field allows you to choose from the following search criteria: Form Name, Menu, Permission and All Fields.
An example of using the quick menu search:
If you would like to find General Ledger form, you would select Form Name in the combo box field next to Matching field, then type General Ledger in the field to the right of the word 'Filter'. As you type General Ledger, form listings will automatically filter and show only forms that match the entered letter/s.
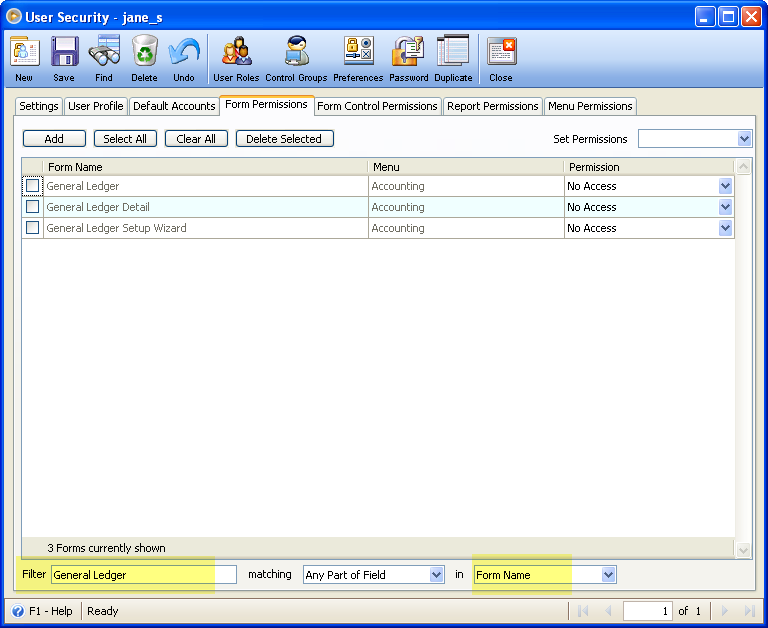
The Grid area is used to display all forms added. In here you can give or deny permission to specific forms.
Here are the Form Permissions to choose from.
![]() Full Access – allows all functions on Form’s data.
Full Access – allows all functions on Form’s data.
![]() No Access – allows no interaction on Form’s data. This means that no data will be loaded; adding and deleting will not be allowed.
No Access – allows no interaction on Form’s data. This means that no data will be loaded; adding and deleting will not be allowed.
![]() View Only – allows loading/viewing of data. Adding and deleting will not be allowed.
View Only – allows loading/viewing of data. Adding and deleting will not be allowed.
![]() Add – allows adding only
Add – allows adding only
![]() View/Add – allows all functions on Form's data, except deleting.
View/Add – allows all functions on Form's data, except deleting.
![]() Edit – allows editing only.
Edit – allows editing only.
Form Control Permissions Tab
The Form Control Permissions tab allows you to give or deny permission for users to specific form controls. This is a very powerful feature, because you can establish specific permissions for each and every user. You will see that all VisionCore form controls are displayed here and are arranged by module.
Buttons at the top of the form
![]() The Add button when clicked will open the Add Form Control Permission form where you can select VisionCore form controls to be added on the Form Control Permissions tab.
The Add button when clicked will open the Add Form Control Permission form where you can select VisionCore form controls to be added on the Form Control Permissions tab.
![]() The Add Group button when clicked will open the Add Form Control Permission form where you can select control group permissions that are previously added. So before you can select a control group you will have to create it first from User Control Groups form. This form can be opened by clicking Control Groups button at top of the Security form.
The Add Group button when clicked will open the Add Form Control Permission form where you can select control group permissions that are previously added. So before you can select a control group you will have to create it first from User Control Groups form. This form can be opened by clicking Control Groups button at top of the Security form.
![]() The Select All button will select all form controls added on the Form Control Permissions tab, and, if you select a permission from the Set Permission combo box field, you will automatically change all the permissions for the selected form controls. Example, clicking Select All button then selecting Disable in Set Permissions field will change all the permissions for the selected forms to Disable.
The Select All button will select all form controls added on the Form Control Permissions tab, and, if you select a permission from the Set Permission combo box field, you will automatically change all the permissions for the selected form controls. Example, clicking Select All button then selecting Disable in Set Permissions field will change all the permissions for the selected forms to Disable.
![]() The Clear All button will clear or remove form controls from being selected.
The Clear All button will clear or remove form controls from being selected.
![]() The Delete Selected button will remove selected form controls from displaying on Form Control Permissions grid area.
The Delete Selected button will remove selected form controls from displaying on Form Control Permissions grid area.
The Set Permissions field at the top of the form is used to quickly set permission on all selected form controls. You may also use the Permission drop down combo box to one-by-one set Permission to a form control.
Form Control Types:
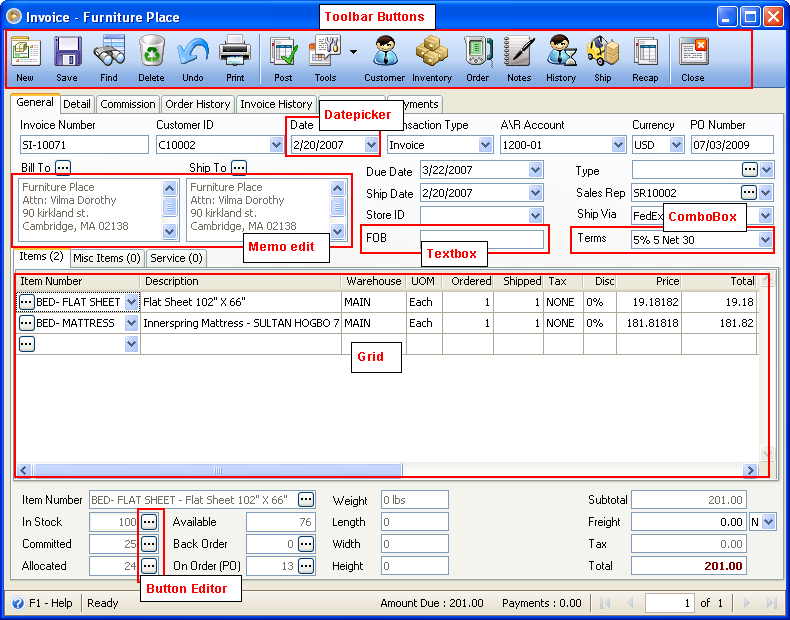
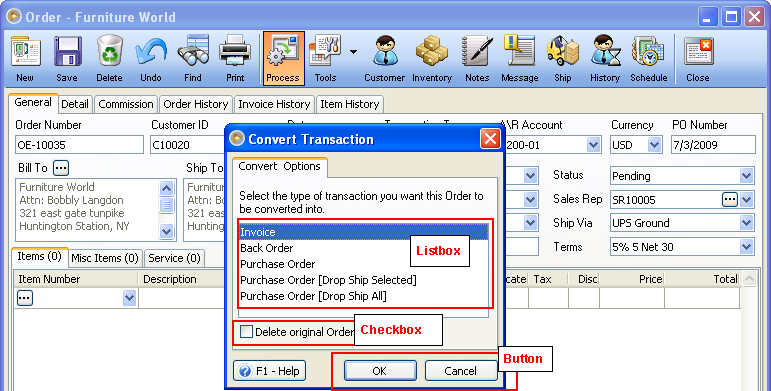
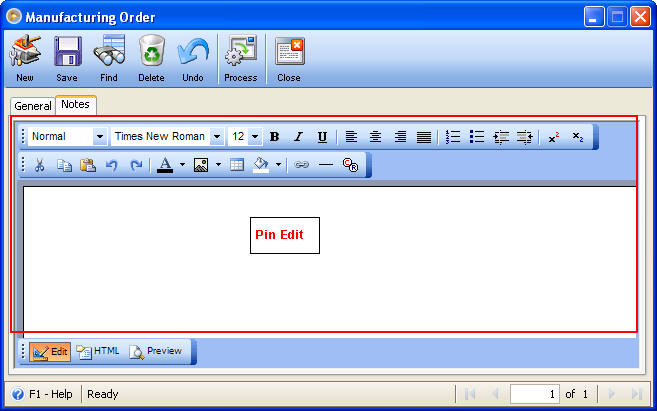
![]() Button
Button
![]() Button Editor
Button Editor
![]() Checkbox
Checkbox
![]() ComboBox
ComboBox
![]() Datepicker
Datepicker
![]() Grid
Grid
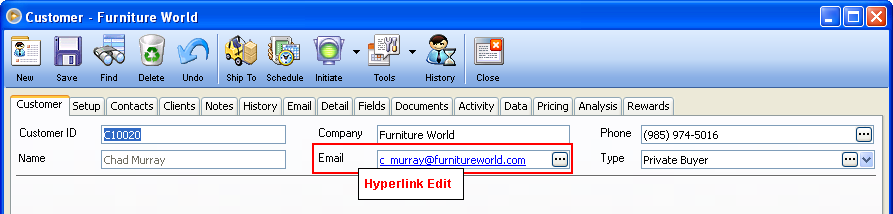
![]() HyperLink Edit
HyperLink Edit
![]() Listbox
Listbox
![]() Memoedit
Memoedit
![]() Pin Edit
Pin Edit
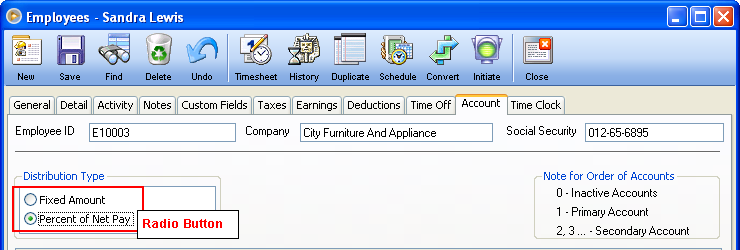
![]() Radio Button
Radio Button
![]() Textbox
Textbox
![]() Toolbar Buttons
Toolbar Buttons
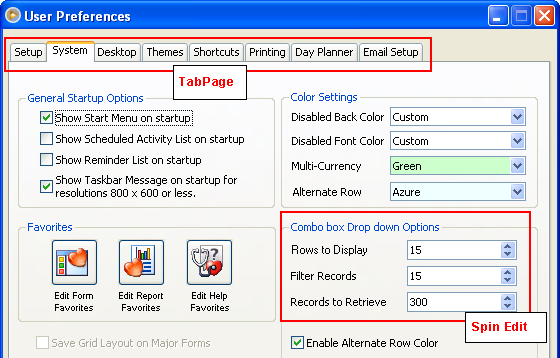
![]() Spin Edit
Spin Edit
![]() TabPage
TabPage
Here are screenshots to show you an example of the above form controls types.
The quick search fields at the bottom of the form gives you the most flexible way to search for, or find the specific form controls you are looking for. Once you have narrowed your search down to the desired forms, you proceed with setting form control permissions.
Search fields
The Filter field is an input field. As you type in every letter into this field, it automatically filters records that match the entered letter/s or word/s.
The Matching combo box field allows you to choose a default match to search and filter records. The options to choose from are Start Field, Any Part of field and Whole Field.
The In combo box field allows you to choose from the following search criteria: Form Name, Control Type, Control Name, Module, Permission and All Fields.
An example of using the quick menu search:
If you would like to find all form controls form Write Checks form, you would select Form Name in the combo box field next to Matching field, then type Write Check in the field to the right of the word 'Filter'. Now all form controls for Write Checks form will be filtered.
The Grid area is used to display all form controls added. In here you can give or deny permission to specific form controls.
Here are the Form Control Permissions to choose from.
![]() Disable – the control is disabled but visible
Disable – the control is disabled but visible
![]() Hide – the control is hidden and disabled
Hide – the control is hidden and disabled
![]() Bypass – the control is skipped through during “Tabbing” but is still enabled
Bypass – the control is skipped through during “Tabbing” but is still enabled
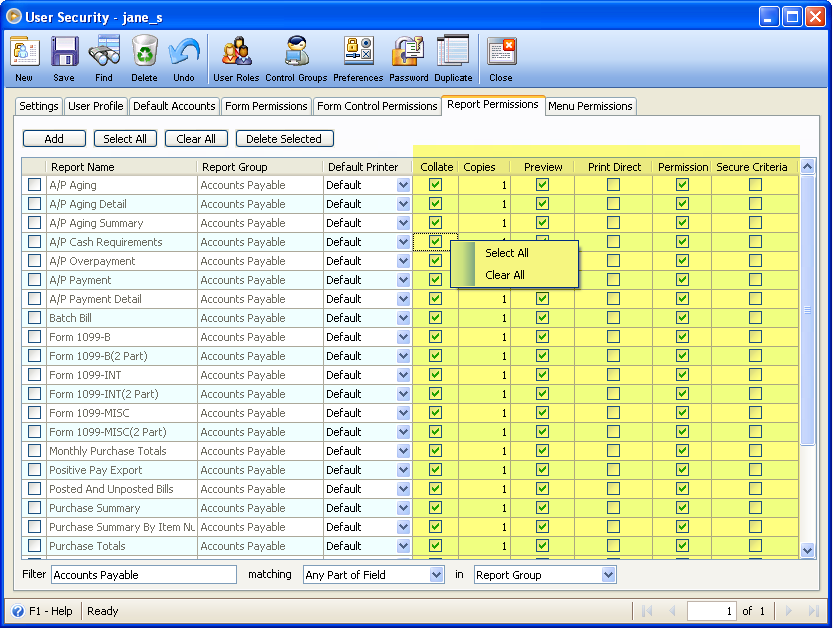
Report Permissions Tab
The Report Permissions tab allows you to give or deny permission for users to specific reports. This is a very powerful feature, because you can establish specific permissions for each and every user. You will see that all VisionCore reports are displayed here and are arranged by module.
Buttons at the top of the form
![]() The Add button when clicked will open the Add Report Permission form where you can select VisionCore reports to be added on the Report Permissions tab.
The Add button when clicked will open the Add Report Permission form where you can select VisionCore reports to be added on the Report Permissions tab.
![]() The Select All button will select all reports added on the Report Permissions tab. Example, clicking Select All button then selecting Delete Selected button, all reports selected will be removed from the report permission grid area.
The Select All button will select all reports added on the Report Permissions tab. Example, clicking Select All button then selecting Delete Selected button, all reports selected will be removed from the report permission grid area.
![]() The Clear All button will clear or remove reports from being selected.
The Clear All button will clear or remove reports from being selected.
![]() The Delete Selected button will remove selected reports from displaying on Report Permissions grid area.
The Delete Selected button will remove selected reports from displaying on Report Permissions grid area.
The quick search fields at the bottom of the form gives you the most flexible way to search for, or find the specific report you are looking for. Once you have narrowed your search down to the desired report/s, you proceed with setting the permissions.
Search fields
The Filter field is an input field. As you type in every letter into this field, it automatically filters records that match the entered letter/s or word/s.
The Matching combo box field allows you to choose a default match to search and filter records. The options to choose from are Start Field, Any Part of field and Whole Field.
The In combo box field allows you to choose from the following search criteria: Report Name, Report Group, Default Printer and All Fields.
An example of using the quick menu search:
If you would like to find all reports under Accounts Payable report group, you would select Report Group in the combo box field next to Matching field, then type Accounts Payable in the field to the right of the word 'Find'. Now all reports under Accounts Payable report group will be filtered.
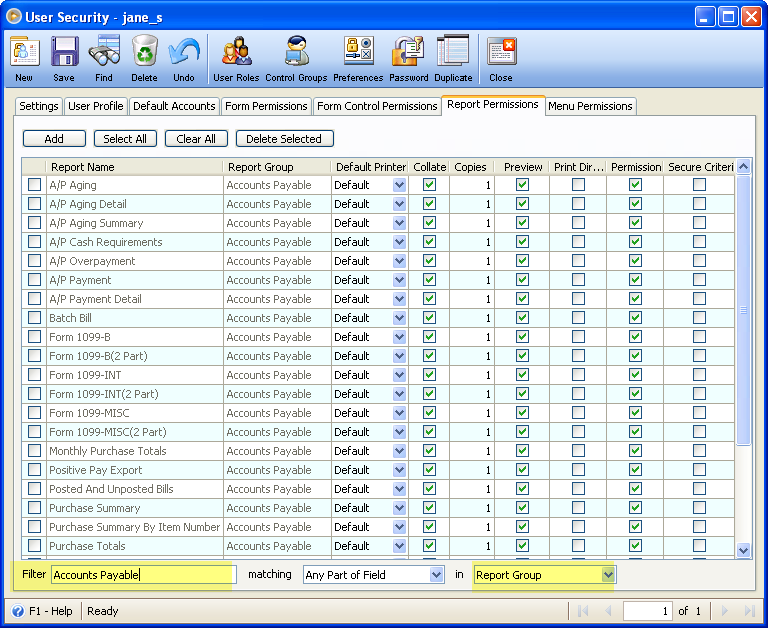
To configure report settings like Collate, Copies, Preview, Print Direct, Permission and Secure Criteria, you may right-click on the particular column and options Select All and Clear All will be available. If Select All is selected then all reports displayed will be checked, while if Clear All is selected, then all reports will be unchecked.
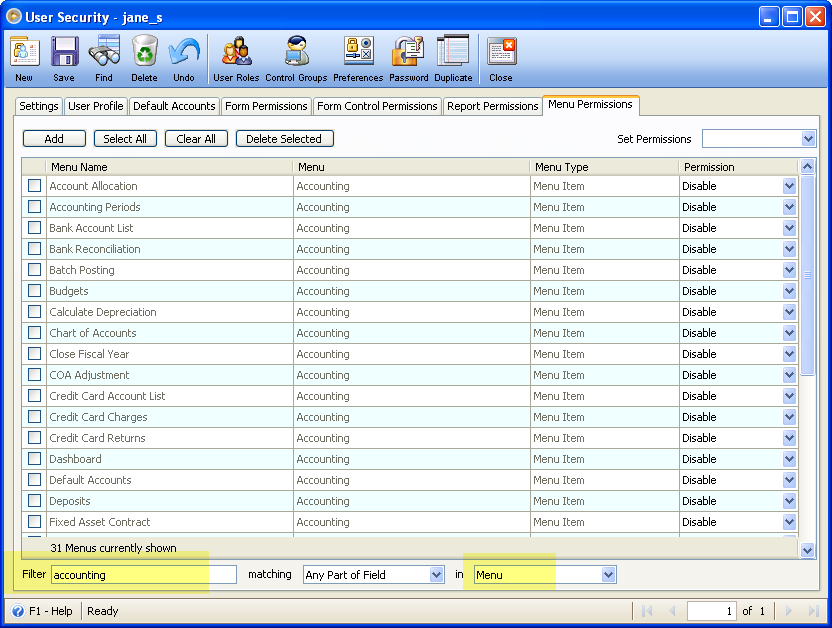
Menu Permissions Tab
The Menu Permissions tab allows you to give or deny permission for users to specific menu, sub-menu or topic under a menu. This is a very powerful feature, because you can establish specific Permission Level for each and every user. You will see that all VisionCore menu, sub-menu and other menu items are displayed here and are arranged by module.
Buttons at the top of the form
![]() The Add button when clicked will open the Add Menu Permission form where you can select VisionCore menu, sub-menu and topics under a menu to be added on the Menu Permissions tab.
The Add button when clicked will open the Add Menu Permission form where you can select VisionCore menu, sub-menu and topics under a menu to be added on the Menu Permissions tab.
![]() The Select All button will select all items added on the Menu Permission tabs, and, if you select a permission from the Set Permission combo box field, you will automatically change all the permissions for the selected menus. Example, clicking Select All button then selecting Disable in Set Permissions field will change all the permissions for the selected menus to Disable.
The Select All button will select all items added on the Menu Permission tabs, and, if you select a permission from the Set Permission combo box field, you will automatically change all the permissions for the selected menus. Example, clicking Select All button then selecting Disable in Set Permissions field will change all the permissions for the selected menus to Disable.
![]() The Clear All button will clear or remove menus from being selected.
The Clear All button will clear or remove menus from being selected.
![]() The Delete Selected button will remove selected menus from displaying on Menu Permissions grid area.
The Delete Selected button will remove selected menus from displaying on Menu Permissions grid area.
The Set Permissions field at the top right of the form is used to quickly set permission on all selected menus. You may also use the Permission drop down combo box to one-by-one set Permission to a menu.
The quick search fields at the bottom of the form gives you the most flexible way to search for, or find the specific menus you are looking for. Once you have narrowed your search down to the desired menu items, you proceed with setting the menu permissions.
Search fields
The Filter field is an input field. As you type in every letter into this field, it automatically filters records that match the entered letter/s or word/s.
The Matching combo box field allows you to choose a default match to search and filter records. The options to choose from are Start Field, Any Part of field and Whole Field.
The In combo box field allows you to choose from the following search criteria: Menu Name, Menu, Menu Type, Permission and All Fields.
An example of using the quick menu search:
If you would like to find all menu item under Accounting module, you would select Menu in the combo box field next to Matching field, then type Accounting in the field to the right of the word 'Filter'. Now all menu items under Accounting will be filtered.
The Grid area is used to display all menus added. In here you can give or deny permission to specific menus.
Here are the Menu Permissions to choose from.
![]() Disable – the menu is disabled but visible
Disable – the menu is disabled but visible
![]() Hide – the menu is hidden and disabled
Hide – the menu is hidden and disabled
![]() VisionCore Tip: The Administrator Type is the only User who can modify other Users.
VisionCore Tip: The Administrator Type is the only User who can modify other Users.
Toolbar Buttons
Toolbar Buttons perform an action on the current record like adding, deleting or saving.
![]() The New button will allow a new user to be added.
The New button will allow a new user to be added.
![]() The Save button will save the selected user.
The Save button will save the selected user.
![]() The Find button will enable you to Find Users.
The Find button will enable you to Find Users.
![]() The Delete button will delete the selected User.
The Delete button will delete the selected User.
![]() The Undo button will cancel out the last change/s done to the record reverting it to its older state.
The Undo button will cancel out the last change/s done to the record reverting it to its older state.
![]() The User Roles button will open the User Roles form where you can add, edit or delete user roles.
The User Roles button will open the User Roles form where you can add, edit or delete user roles.
![]() The Control Groups button will open the Control Groups form where you can add, edit or delete control groups.
The Control Groups button will open the Control Groups form where you can add, edit or delete control groups.
![]() The Password button will open the Change Password form where you can change the user's password when logging in to VisionCore.
The Password button will open the Change Password form where you can change the user's password when logging in to VisionCore.
![]() The Duplicate button will open the Duplicate User Settings form to allow you to create new user and then apply or use the security settings of an existing one.
The Duplicate button will open the Duplicate User Settings form to allow you to create new user and then apply or use the security settings of an existing one.
![]() The Close button will close the Security form.
The Close button will close the Security form.
Press F1 or click F1-Help button in the Status bar for help on how to use the Security form.